[前端框架] Angular - 元件、數據綁定、指令

前面介紹了基本安裝與工作環境,並且理解基本的資料綁定與內建指令。這裡會介紹元件和資料綁定的深入探討細節。另外對指令進行深入理解。
前置準備
本篇的起始素材放置於 GitHub 底下提供使用,使用資料目錄 lokiSecond 作為初始環境。下載請記得 npm install 初始化環境。
Github download at lokiSecond-start Folder
小技巧:關於 Bootstrap In Angular
因為有使用 Bootstrap5 美化,如專案需要可自行安裝npm install bootstrap,並對 angular.json 的styles:[]多添加
"styles": [ |
就能在 Angular 內使用 Bootstrap,載入 CSS 的位置還有其他方式可參考 3+ Ways to Add Bootstrap 4 to Angular 10/9 With Example & Tutorial | Techiediaries 說明教學。
素材的內容為提供標題與內容輸入,且提供兩個按鈕進行不同的 Card 列表並有些差異效果。大致上都是根據之前學過的語法來完成這些工作。現在都是同一份元件來進行作業。也許是讓文件更清爽好懂,分開元件使得工作更局部完整。
拆解 Component
根元件 app 應該保持簡潔,盡可能將代碼塞入其他子元件利用勘套的方式來完成。也能將小元件被重複使用。分開想法為將上列的輸入操作規劃為 cockpit 元件,下列的 card list 結果規劃為 server-element 元件。
透過 CLI 指令快速建立元件,完成後能在 app 目錄下多兩個元件目錄。
ng g c cockpit |
接著將 app 元件內整理一下,跟隨以下步驟處理:
- 將 app-root 內的 hr 上半部
div.row剪貼到 cockpit html 內。並替換成元件名稱。app.component.html <div class="container">
<app-cockpit></app-cockpit>
<hr>
<!-- ... -->
</div>cockpit.component.html <div class="row">
<div class="col-xs-12">
<p>Add new Servers or blueprints!</p>
<label>Server Name</label>
<input
type="text"
class="form-control"
[(ngModel)]="newServerName"
>
<label>Server Content</label>
<input
type="text"
class="form-control"
[(ngModel)]="newServerContent"
>
<br>
<button
class="btn btn-primary"
(click)="onAddServer()"
>Add Server</button>
<button
class="btn btn-primary"
(click)="onAddBlueprint()"
>Add Server Blueprint</button>
</div>
</div> - 利用 IDE 編輯器的報錯,cockpit 有使用到兩個屬性與兩個方法。一樣搬移到自己的 ts 內。
cockpit.component.ts import { Component } from '@angular/core';
({
selector: 'app-cockpit',
templateUrl: './cockpit.component.html',
styleUrls: ['./cockpit.component.css']
})
export class CockpitComponent {
newServerName = '';
newServerContent = '';
onAddServer() {
this.serverElements.push({
type: 'server',
name: this.newServerName,
content: this.newServerContent
});
}
onAddBlueprint() {
this.serverElements.push({
type: 'blueprint',
name: this.newServerName,
content: this.newServerContent
});
}
} - 現在又報錯 serverElements 屬性缺少,我們先擱著,因為這個屬性另一個 server-el 也要用到。
- 原本需要將 app-root 內的 hr 下半部
div.row剪貼到 server-el html 內,但因為有迴圈我們應該讓 server-el 為單筆 card 資訊,讓 app-root 能重複使用我們的小元件。因此剪貼範圍縮到 card 本身,並替換成元件名稱且執行 ngFor。app.component.html <div class="container">
<app-cockpit></app-cockpit>
<hr>
<div class="row">
<div class="col-xs-12">
<app-server-el *ngFor="let element of serverElements"></app-server-el>
</div>
</div>
</div>server-el.component.html <div class="card mb-3">
<div class="card-header">{{ element.name }}</div>
<div class="card-body">
<p>
<strong
*ngIf="element.type === 'server'"
style="color: red"
>{{ element.content }}</strong>
<em *ngIf="element.type === 'blueprint'">{{ element.content }}</em>
</p>
</div>
</div> - 現在這個 server-el 的 ts 也報錯,因為 element 屬性來自於 ngFor 批次出來的變數,但 ngFor 跑到上層元件去也是找不到。
最後,目前來說隨著分解元件導致有些通信斷掉。我們需要讓元件之間能傳遞資訊十分重要,接下來討論如何修好它。大致上的方向為 app 與 element-el 如何執行屬性綁定(讀取資料),以及 app 與 cockpit 如何執行事件綁定(寫入資料)。而資料會在 app 元件上等待兩個下層元件進行寫取。
元件之間的互動(屬性與事件綁定)
稍微盤點一下 Property & Event Binding 有在各話題上的綁定用途
- HTML Elements
透過元素的原生屬性來做一些事件,也就一開始學的基礎東西。像是控制 disable 屬性要不要執行、將事件綁定給屬性如 click 事件做些資料發送,甚至使用$event 獲得輸入值。全都是對元素進行屬性上的事件綁定。 - Directives
使用指令做些事情,像是 ngClass 與 ngStyle 這些,也使用屬性綁定來實現它。 - Component
對於元件的操作綁定用途,我們將歸入自訂的屬性與事件。優先示範使用屬性綁定來處理我們的元件屬性,下一個是事件綁定。
公開 server-el 屬性綁定 @Input
處理 server-el 問題之前,我們先將另一個 cockpit 元件內的方法註解掉,先專心處理 server-el 元件的問題。
onAddServer() { |
正式來到 server-el 這邊處理著手問題,我們知道元件缺少了 element 屬性,試著補上並提供強型別(目前並沒有提供值給這個屬性,只單純提供型別)。
import { Component } from '@angular/core'; |
回到上層的 app 元件這裡,這裡產生一些靜態假資料,屆時要提供給下層 server-el。
export class AppComponent { |
目前為止在 app html 的上面能成功跑迴圈產生一筆 card,app 能讀到 app 自己的陣列,但是資料內容 element 我們該如何送進去給下層的 server-el 元件。這是正要討論的問題。如果能類似 disable 那樣透過屬性綁定將 element 資料傳送給我們的下層 server-el 元件,原則上是可行的。為了區別開來 ngFor 的變數名稱換一下。
<div class="container"> |
但事實上會失敗,透過 console 錯誤資訊告知你,屬性 property 本身未定義。這是因為 app 元件本身沒有 element 這個屬性可用。既使下層的 server-el 元件有這個屬性,上層也認不出來。這是在公開權限上的問題,使得上層元件無法知道這個下層元件持有這個屬性而未知存在進行報錯。如果你想讓上層元件能知道下層元件有這個屬性,讓上層元件能綁定該屬性提供給下層,你需要對下層該屬性添加一些動作。
找到下層這個屬性位置,前綴添加@Input(),讓 Angular 知道下層的 element 屬性會從其他地方傳過來。現在能成功地從上層 app 將 element 傳遞給下層 server-el,因為下層有寫這個 element 來自於@Input。
import { Component, Input } from '@angular/core'; //注意這裡要添加來源處 |
現在透過這個可以成功將元素屬性傳遞給每個下層元件去,並綁定給該元件的元素屬性。這就是下層屬性公開了自己的 element 屬性提供進行輸入。
使用屬性別名
你可以使用別名方式讓外部元件以其他名字來傳遞給下層元件,下層元件再換成自己的屬性名稱。透過@input('別名')達到。這能幫助你在綁定屬性的命名上避免衝突到,這裡我們別名改成 srcElement 來試試。
<app-server-el |
export class ServerElComponent { |
公開 cockpit 的事件綁定 @Output
接下來處理事件綁定的部分,同樣的我們要思考下層如何將它的資料傳遞出來給上層讓上層可以接受到。我們先處理上層元件,應該是讓上層元件接受一些資訊對自己的 serverElements 陣列進行寫入。相同的我們需要兩個 Method 來做寫入屬性動作。參考後來搬移給 cockpit 的 method 寫法。這裡名稱另外取名為 Done 是因為動作在 cockpit 已執行完畢,app 元件只是負責將它寫入到陣列內。
app 的 Method 會獲得兩個東西,分別是 name 與 content(來自 cockpit 的兩個 input)。因此假定我們透過參數拿到這樣的 object,並注意提供強型別。
import { Component } from '@angular/core'; |
現在只要有誰執行了 app 的 method 就必須要提供參數才能寫入到 app 的屬性資料內。因此與 cockpit 關聯的地方在於 app html 上,我們需要綁定一個事件並提供$event 作為參數讓 app 的 method 能取得資料的 name 與 content。我們先命名創造出兩個 cockpit 根本不存在的名稱作為事件綁定,並能對 app 的 Method 傳遞資料參數,之後還要到 cockpit 裡面創造自定義的事件綁定。
<app-cockpit |
來到 cockpit 這裡,元件內先創造兩個不存在的屬性。這兩個屬性是透過 new EventEmitter() 物件來建立,並額外告知強型別為我們指定的 object。
import { Component, EventEmitter } from '@angular/core'; //宣告 EventEmitter 來源 |
EventEmitter 為事件發射器,作為自訂事件觸發與監聽。我們會用到 emit() 來操作要發出去的值。詳情請參閱 Angular API
現在 cockpit 裡面已經準備好兩組自訂事件之屬性,該是考慮讓 cockpit 內的兩個 method 動作下能對該兩個自訂事件塞值進去。我們得透過 emit 來塞值。現在 method 已經大改了,我們替換如下
export class CockpitComponent { |
照理來說,目前的邏輯都很正常也沒有錯誤訊息依然無法提供給上層元件。跟前面的觀念一樣,@input()能讓屬性可以從外部進行屬性綁定。而這裡為@Output為讓我們的 cockpit 能接受到來自外面的監聽。
import { Component, EventEmitter, Output } from '@angular/core'; //宣告 Output 來源 |
恭喜目前可以運作了,其實也就是屬性綁定與事件綁定話題。原本基礎觀念是對同元件下的 html 元素來進行作業,現在擴大到元件之間的通信。而元件之間的通信除了原本的屬性綁定與事件綁定,還要多考量 Input 與 Output,這是因為元件之間彼此獨立互不影響,透過這兩個函式才能外部綁定到內部屬性,或者是從內部接收來自外部的事件監聽。
使用不同屬性名稱
跟 Input 一樣,你可以使用別名來做兩者之間通信的名稱。也保護內部屬性的原名稱不曝光。
<app-cockpit |
('sLoki') serverCreated = new EventEmitter<{ sName: string, sContent: string }>(); |
總結
透過這些自訂屬性綁定與事件綁定,你可以讓上下層的父子元件之間進行通信,透過 input 將父層的資料傳送到子層,而透過 output 將子層的事件發送給父層被捕捉。
然而,如果是同層的兄弟元件就會比較複雜些,就要利用父元件當跳板傳遞給這些子元件並大量使用到 Input 與 Output,但這不是很實用的一件作法,之後有另外一種 servers 的做法可以讓兄弟元素之間進行通信。
元件之間的 View 封裝
你是否過程中發現,分解之前會有藍色字樣的輸出,經過分解與通信修復後,這個藍色的 CSS 效果消失了。這個 p 元素的 style 被設定在 app 的 css 內。其不像過去我們 CSS 觀念上所繼承給下層元件。事實上這是 Angular 的強制行為而不是瀏覽器對 CSS 的默認繼承行為。透過網頁 F12 檢查可以很清楚發現 Angular 會自作主張的對每個元件下的元素添加一些有的沒的。現在試著將這個藍色的效果搬移到 server-el 元件內的 css 看看。
p { |
現在再去檢查並嘗試輸入一下欄位送出,會發現藍色字樣跑出來了。透過 F12 檢查可以發現 angular 對 p 元素添加了隨機的屬性名稱,而 css 的選擇器也自動添加這個屬性名稱。這都是 Angular 搞得鬼,這是一個保護機制,意味了我們每個元件都有自己封裝的 View 範圍彼此不受影響而被保護。如果你不想要這樣的保護,你可以編譯到 index.html 那層的 styles.css,那裏才是對整個網頁所影響的樣式表,元件內的樣式表只對該元件有效,這是 Angular 默認行為。
取消元件封裝
如果這個元件不想要封裝,也就是不要產生類似影子 DOM,將所有元件下的元素都不要添加相同亂碼的元素屬性某參數。可以找到該元件的 @Component 添加 ViewEncapsulation 並指定參數 None 調整 (Emulated 模擬為預設值可以不用寫)。
import { Component, Input, ViewEncapsulation } from '@angular/core'; //宣告來源 |
現在回頭看一下 F12 發現已經沒有奇怪字串值屬性出現在這個元件內的元素上,同時該元件的 css 部分也不會去添加奇怪字串值屬性。因此現在這個元件下的 css 將會影響整個網頁。舉例
label{ |
現在這個效果因為沒有封裝而導致影響到另一個 cockpit 元件內的 label 元素之樣式了。
使用本地變數做範本訪問
舉例 cockpit 元件,原本的素材包有使用到 ngModal 來進行雙向綁定。每當我們輸入資料時,會同時的變動元件內的屬性值這是已知做法。事實上在同一份元件的 template 內,我們有更快的方法來取代這個雙向綁定。就是直接對本地進行引用參考。所謂的本地變數就是將 html 元素進行別名使用#name作為 html 屬性。
透過事件綁定的參數傳遞
接著透過 event binding 作為參數提供給 TS,這樣就能在 ts 內對這個元素進行使用。這裡拿其中一組 input 的 ngModal 做修改示範。
- 對目標 HTML 元素提供
#inputServerName屬性給予一個別名 - 現在在這個 html 內已經存在這個物件,你可以找地方試試
{{inputServerName}}當做字串輸出 - 將這個別名放在按鈕的事件綁定成為一個本地的變數,當作參數傳遞給 TypeScript
- 由於這個參數的強型別為 HTML 的 input 元素,記得給予 HTMLInputElement 型別,可試著 console.log 看看這是甚麼參數
- 既然獲得了這個元素,很自然能用元素底下的 value 當作我們來源值使用
- 最後,如果修改成功,原本 ts 內的 newServerName 初始屬性也就用不到了
<div class="row"> |
export class CockpitComponent { |
這個方法只限定於本地上使用,同時需要搭配參數的方式傳遞給 TypeScript。
ViewChild 檢視查詢
如果你不想透過 Method 使用參數方式傳遞給 TypeScript,可以考慮使用@viewChild方式來獲得該訪問權限。ViewChild 能透過查詢找到 View 裡面的小孩(需要別名)提取出來,我們拿另一個 input 做修改示範。
- 首先還是需要一個本地變數來實作第一步。這裡命名為
#inputServerContent - 現在不透過 html 這裡的 event binding,而是直接來到 TypeScript 這裡創造一個初始屬性為透過
@viewChild並根據變數別名而獲得的屬性值。 - 在
@ViewChild輸入指定該 HTML 別名使其找到,並指定一個新變數名稱做存放。若在其他用途上@ViewChild也能指定 component 名稱而使用。 - 嘗試 Console 出來看看,拿到一個 ElementRef。所以回頭補上強型別為 ElementRef,而一開始不認識 ElementRef,所以也要宣告 ElementRef 的來源。
- 要取出 value,就藏在這個物件的 nativeElement.value 底下。所以修改了 Method 改從這裡提取來源值。
- 如此一來我們透過
@viewChild方式來獲取,直接去訪問 template 範本內的本地變數,而不是透過事件綁定來獲得。
<div class="row"> |
import { Component, EventEmitter, Output, ViewChild, ElementRef } from '@angular/core'; //宣告 Output 來源 |
目前這兩招都不是透過雙向綁定來讀出資料,都是透過本地變數搭配參數傳遞或從 ViewChild 來獲取。但是是直接去對應到元素的記憶體位置,因此不建議你在 TypeScript 去直接修改寫入 value 例如
this.inputServerContent.nativeElement.value='LokiString',這會影響 View 這裡的值會被固定住。
ng-content 內容投影
內容投影是一種模式,你可以在其中插入來自另一個地方中使用的內容進行投影。舉例來說下層的 cockpit 內的 ngFor 想搬到上層元件內(雖然一開始素材就這樣做,這裡只是為了示範有這種神操作)。在那之前有一個觀念要說明,在上層元件的 html 內,使用子元件作為元素替代時,此時該子元件元素下的內容,任何東西都會被 Angular 所捨棄。
<app-server-el |
如果子元件內的 html 有指定 ng-content 元素,則代表我有一部份內容投影到來自放在上層元素 html 那裏。為了示範方便把原本的部分代碼註解起來。
<div class="card mb-3"> |
此時觀看畫面,會發現 card-body 內的這個地方會來自父元件 html 那裏所填寫的子元件內容。這就是 ng-content 的用法。現在把註解的地方搬移到父元件那裏的子元件元素當做內容。然而因為提升到父元件那裏,element 這個變數認不得,但我們可以取到上源父元件這裡的 item 做替換。
<div class="container"> |
現在畫面正常了,事實上子元件還是跑到父元件那裏索討內容,這例子唯一比較搞混的問題是 template 範本內的變數是否存在。ng-content 可以做為取代一些屬性綁定的資料傳送,本身就是一種 HTML 轉義行為,在跨網域 Script 駭客攻擊上有很好的預防效果。
元件的生命週期 Hook
生命週期是每一個框架經典需知道的重要觀念。Angular 提供了一些相關流程過程並提供一些方法,允許你監聽指令和元件的生命週期,比如建立、更新和銷燬等。舉例來說每次 CLI 產生的原件就有附加提供 onInit 的 Hook 使用。Angular 會按以下順序呼叫 Hook 鉤子方法:
- ngOnChanges - 在輸入屬性 (input)/輸出屬性 (output) 的繫結值發生變化時呼叫。
- ngOnInit - 在第一次 ngOnChanges 完成後呼叫。
- ngDoCheck - 開發者自訂變更檢測。
- ngAfterContentInit - 在元件內容初始化後呼叫。
- ngAfterContentChecked - 在元件內容每次檢查後呼叫。
- ngAfterViewInit - 在元件檢視 (View) 初始化後呼叫。
- ngAfterViewChecked - 在元件檢視 (View) 每次檢查後呼叫。
- ngOnDestroy - 在指令銷燬前呼叫。
參閱官方文件關於 生命週期鉤子(Lifecycle hook)
當創建一個元件並運行時 Angular 透過 selector 對象找到這個元件開始實體化創建到我們的 DOM,過程上會經歷一些階段。因此我們可以利用這些階段安排一些代碼作業。透過 Angular 提供的方法來進行這些 Hook 動作。
OnChanges
第一個 Hook 階段,一開始創建元件時就開始執行,且後續還可能會被執行很多次,當我們屬性綁定的@Input或@Output接受到新值會再經歷一次。
OnInit
第二個 Hook 階段,當元件被初始化後就會被執行,此時還沒有添加到 DOM 上,只是 Angular 正在對元件做基本的初始化,ngOnInit 會在建構函數 constructor 之後執行,
DoCheck
第三個階段且只有在變更檢測當下運行。因為第一階段 ngOnChange 的關係也可能影響到到被執行多次。變更檢測只是 Angular 需要確定元件內的 template 或內部資料要確認是否有些內容被更改。譬如某個數字 1 變成 2 並該屬性需要在 template 輸出,那就會需要做變更檢測才能重新渲染這個 template。
有些時候第一階段的 ngDoCheck 會再次運行,因為你可能做了一些沒有改變資料的事件,但由於是一個事件行為,Angular 還是得去進行 ngDoCheck 的變更檢測作業執行。Angular 會確保檢查是否有變。
雖然看起來很吃效能但 Angular 處理得很好沒有花費多少效能,你可以利用變更檢測當下週期做一些 Angular 無法預判到的變化時給予代碼作業。
AfterContentInit
第四階段,每當使用 ng-content 內容投影進行初始化時會觸發這個階段。因此不是指該元件本的 View,而是父元件的 View 那裏,尤其是透過內容投影添加到自己元件的 View 時。每當改變檢測檢查時發現到我們的內容投影有更改而被執行,
AfterViewInit
第五步驟,當第四步驟完成了該元件的 View 完成初始化後就會達到這階段。
AfterViewChecked
第六步驟,前步驟會緊接著將 View 進行被檢查,確保所有的更改都會顯示到 View 內,或者當 Angular 沒有檢測到任何變化時,會進入這個階段。
OnDestroy
如果你要銷毀一個元件,例如透過 ngIf 設定為 false,要求 DOM 銷毀掉這個元件,在銷毀之前就會觸發這個階段。
連續示範操作
使用剛剛的教材做一下示範流程透過 Console 探討這些 Hook 發生的時機為何。
ngOnInit()
跳到 server-el 的 ts,也許被我們刪除掉了試著重新使用 ngOnInit。
使用這些 Hook 需注意要在 Class 後面宣告使用該工具 (implements) 以及宣告來源。每個 Hook 都是獨立實施。
import { Component, Input, ViewEncapsulation, OnInit } from '@angular/core'; //宣告來源 |
當我們執行加載應用程式時,我們會發現這個元件會經歷了 1th 與 2nd 兩個。如果嘗試操作按鈕讓 server-el 元件重複地被使用並實體化出來。會出現 1th > 2nd > 1th > 2nd > …,因此所有的 Hook 都會再次被執行,因為每次的元件使用都是全新被實體化出來。以及有個共通點在於物件類別 Class 的建構函式之後。
ngOnChanges()
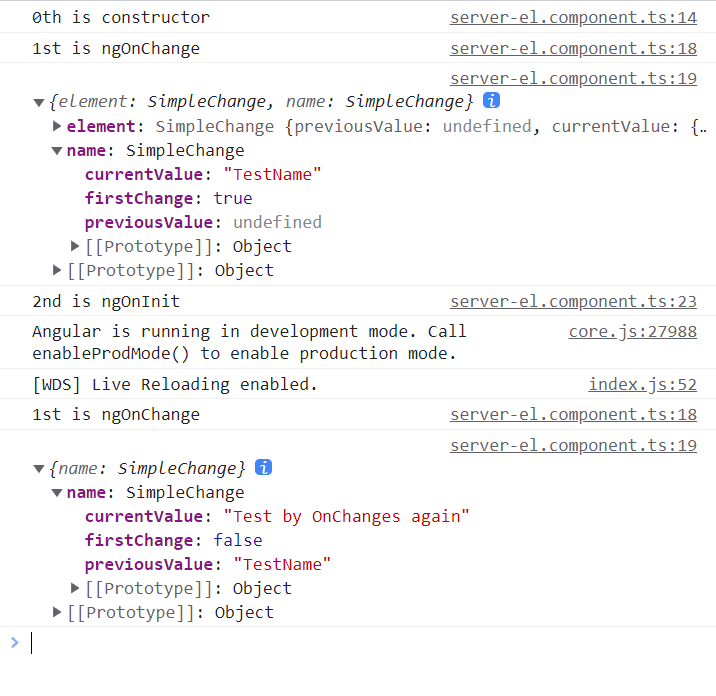
回到週期的一開始討論到 ngOnChanges 會第一階段被執行。這裡的例子剛好有使用@Input可以拿來示範,添加 ngOnChanges 方法來運行。另外再告知這裡事實上能接受到一個參數(只有這個 Hook 才有),他的強型別為 SimpleChanges 故需要宣告來源。
import { Component, Input, ViewEncapsulation, OnInit, OnChanges, SimpleChanges } from '@angular/core'; //宣告來源 |
查看 changes 參數就是我們的@input 所提供的元素(使用 SimpleChange 型別)。可以獲得一些資訊
- currentValue : 我們因為@input 而獲得資料在 element.currentValue
- firstChange: 這是我們第一次的改變,因為才剛初始化。
- previousValue: 前一次的舊值為 undefined,因為之前還沒有獲得此資料。
也就是說可推理出 ngOnChanges 會發生很多次影響這些 SimpleChanges 不同內容。跟著做以下代碼操作來試著測出這些可能性。
- 到父元件 app,找一個單純地方增加一個按鈕為 Change First Element 並做事件綁定觸發 onChangeOne() 方法
- 同樣父元件 app 需提供一個 onChangeOne() 方法去修改,我們只想更改原本 element.currentValue.name 而已。
<div class="container"> |
export class AppComponent { |
現在觀察畫面,嘗試按下 btn-danger 按鈕,可以成功改寫 Server Name 但是 console.log 不會觸發 OnChanges 執行。因為我們只是更改@input element{...}裡面的記憶體內某處的數據,Angular 不會感覺到這個值被改寫而觸發 OnChanges,因此我們要多做一個@input 只感應 name 這個參數。
- 對子元件 server-el 多設計一個
@input name,因為原本的@input 我們沒有辦法去改變整個陣列 - 對父元件 app 對引用元件的地方做屬性綁定,將我們的 name 提供給子元件。
export class ServerElComponent implements OnInit, OnChanges { |
現在試著回到畫面,一開始的 ngOnChange 被觸發因為有兩個@input提供到 SimpleChange 物件。可以看到第二組@input的初始之況狀,接著下一步驟按下 btn-danger 可以又獲得 ngOnChange(且無 0th & 2nd)。經檢查發現第二組@input有感受到變化而再次運行提供給我們並得知為修改之況狀(新舊值且非初次變化)。
最後清楚了解根據以上的示範,換言之可以利用這方法,找出用戶修改前的舊值並把它儲存起來,提供資料復原的神操作。
ngDoCheck()
能提供每次變更檢測的方法,來示範 ngDoCheck 如何被使用。並透過檢查畫面發現 3rd 的訊息出現(基本上應該只會出現一次,但因為目前在開發模式下 Angular 會多一次進行額外的更改檢測週期)。
export class ServerElComponent implements OnInit, OnChanges, DoCheck { |
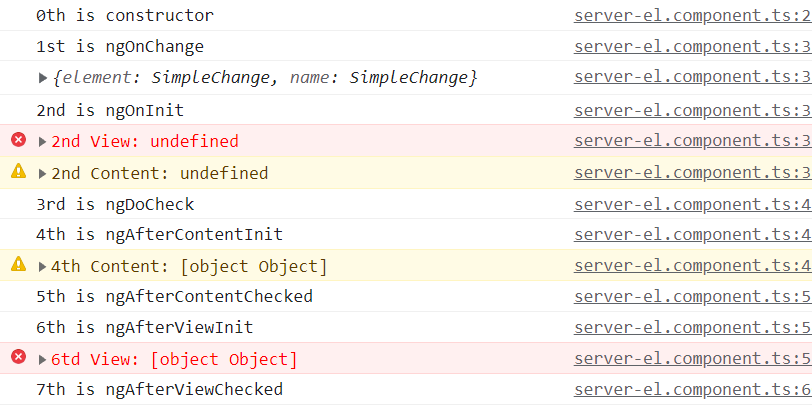
現在嘗試去按幾次 btn-danger 來觀察 3rd 在 console 上的時機,如下圖可以解釋出
- 紅色部分 - 因為一開始初始化會進行變更檢測
- 黃色部分 - 因為 ng serve 的開發模式影響多一次額外檢測
- 綠色部分第 1 下 - 按下 btn-danger 也會進行變更檢測(同時因為有變化觸發 ngOnChanges)
- 綠色部分第 2~10 下 - 再次按下 btn-danger 也會進行變更檢測(因為
@input值沒有變化不會再出現 ngOnChanges)
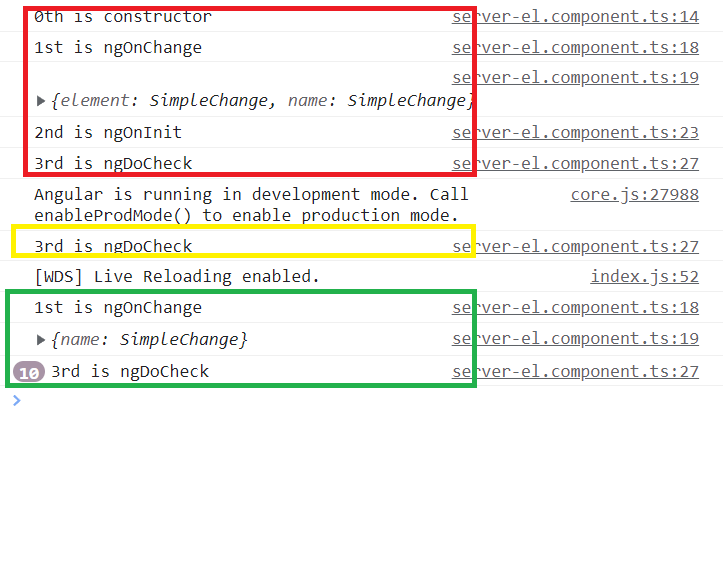
最後每次 Angular 要進行變更檢測時都會觸發這個方法,不管是不是有改還是沒改的 event 事件或是 promise 承諾來觸發(還有其他的觸發器)。但你通常不會在這裡寫太多代碼,不然每次都會被觸發這些代碼很浪費效能,畢竟他運行頻率太頻繁。如果只是開發上的 Debug 測試就蠻適合的。
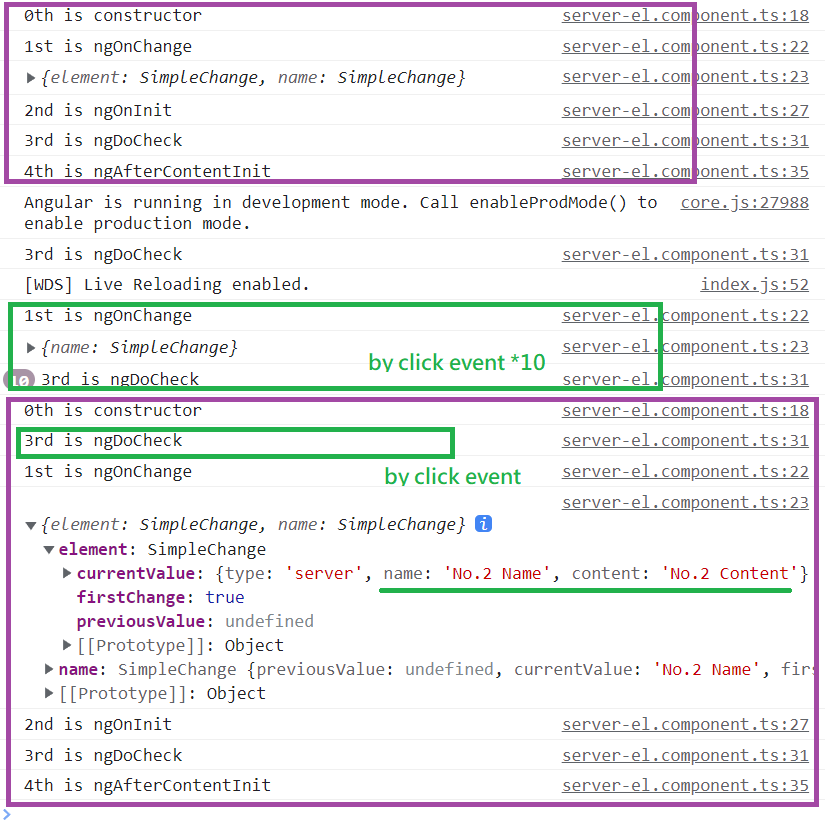
ngAfterContentInit()
在經過更改檢查週期之下一階段才進行此部分,透過添加方法並觀察後畫面上的第一組 server 是透過內容投影產生到 View 上面,因此只有一次調用,在此之後就沒有任何重新變化下這裡不會重新初始化。
import { |
接著嘗試以下動作
- 按下 btn-danger 10 次,沒再次執行因為內容投影未改變。
- 填值(輸入 No.2 *) 並按下 Add Server 來增加第二組 Server,因為內容投影有更改故對第二組 server 內容進行初始化。
現在來討論顏色範圍的時機為
- 第一次紫色 - 那是 Test Server 的系列過程,最後停留在 4th 也就是該內容被初始化
- 第一次綠色 - 同前一次觀念 btn-danger 在第一下觸發到 ngOnChange(
@Input有新變化),之後每下 click 僅剩更改檢查 - 第二次紫色 - 那是 No.2 Server 的產生過程
- 第二次綠色 - 這來開發模式下的更改檢測動作。
ngAfterViewInit() & ngAfterViewChecked()
ngAfterViewInit 將所需要的 View 畫面產生出來後執行,並透過 ngAfterViewChecked 已確保所有的更改結果都在這個 View 裡面後執行。
import { |
ngAfterViewChecked()
元件被銷毀時觸發,除了宣告 OnDestroy 工具使用外,我們額外做一個 click 事件綁定銷毀第一組 server 的元件。
import { |
來到 app 元件這裡規劃一個本地的事件綁定。並試著刪掉陣列中第一組 server-el 元件,陣列拔除的方式因為到時候 ngFor 執行時因為失去了陣列之中的這格也就會被 DOM 所刪除。
onKillOne() { |
<button class="btn btn-warning" (click)="onKillOne()">Kill 1st Element</button> |
現在操作添加第二組 server-el 元件後,嘗試刪除第一組 server-el 元件。透過
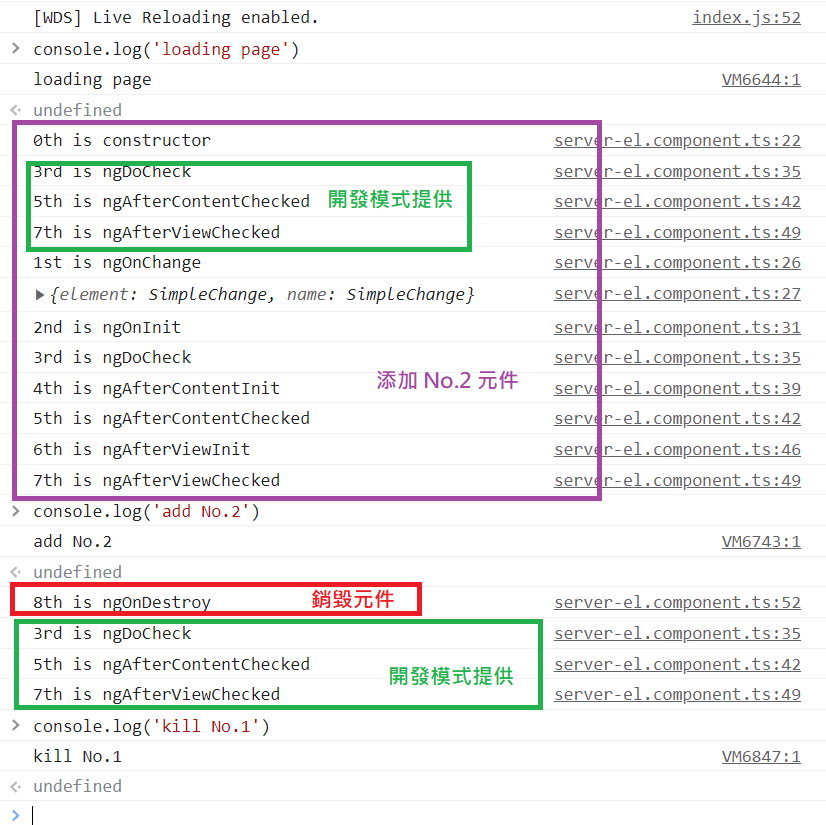
最後結論上,告知你會很少會使用到這些 Hook 工具,除非你需要這些 Hook 來幫助你做一些特定的代碼。
ViewChild 的使用問題
前面聊過本地變數與範本訪問做法,從同一元件我們學過可以 TS 的@VueChild來訪問範本的本地變數來取得 DOM。但是如果我們的生命週期上使用有啥問題存在。
試著建立 viewChild 在 server-el 看看,讓範本的本地變數能被 TS 所使用。這裡本地變數為#cardHeader。
<div class="card-header" #cardHeader>{{ element.name }}</div> |
import { |
由此可知,生命週期的 View 生成時間,會影響到我們去取得本地變數的存在與否 (View 是否已出來了)。
ContentChild 用於內容投影
之前學到 ViewChild 可以從 View 找到指定的元素。但如果是在 ng-content 內容投影就無法處理。因為內容投影的那段 html 被放置在父元件那裏根本不是 View 的一部分。這時侯需要改用 ContentChild 來作業。兩者的差異在於一個是在 View 上查找取得;一個是 Content(內容投影)上查找取得。
- 舉例我們來到使用內容投影的地方,位於 app 元件上,對其 Content 部分規劃別名。
- app 元件的內容會被投影到 server-el 這裡,因此在下層元件這裡我們需要宣告
@ContentChild()來補貨,記得提供別名作為 selector 給該函式。 - 回到 element-el 的週期,他的出現時機在於 ContentInit 時才會產生(比 ViewInit 早)。
- 也參考 OnInit 是否可讀到此元素。
<app-server-el |
import { |
最後回到 console 這裡,你就能知道 ContentInit 在生命週期內的用途時機為何了,這裡為了顏色差異才做 error 與 warn 提示。
小節練習
以下根據本篇學到的東西做一個練習,動作要求如下:
- 建立三個元件 GameControl, Odd, Even
- GameControl 需要提供 Start 與 Pause 按鈕
- 當開始遊戲時,GameControl 事件會一直記數(記錄這個值)並每秒
ref=setInterval()累加 - 這個事件產生的數字必須列表輸出到外面的元件上
- 當暫停遊戲時,原本的事件會停止記數
clearInterval(ref) - 新 Odd 元件要能捕獲到每個奇數值,Even 元件也是要捕獲到偶數值
- 簡單的輸出文字規格為
ODD - *與EVEN - *在這兩個元件 - 使用樣式表例如 p 為選擇器做不同的文字顯示在這兩個元件內
作法如下:
- 首先我們需要對 Game-ctl 進行設計規劃兩個按鈕並提供兩個事件綁定分別是 onGameStart 與 onGamePause
- 然後到 TS 這裡規劃這兩個方法,而在 Start 那裡規劃 setInterval 並獲得一個 key 方便之後做 clearInterval 把動作取消
- key 放置在 class 內作為屬性初始,雖然 JS 的 setInterval 所回傳的是一個 key,但 Node.js 這裡的回傳的型別是
<Timer>我們無法給予初始值因此給予 any 型別 - 由於要透過外層元件也就是上層的 app 負責輸出,這裡用自訂事件來儲存 count 數字(不是用 type number 來做,因為我們要
@Output一個事件綁定給外層) - 規劃 count 的強行別為 new EventEmitter() 並提供回傳的強型別會是 number。然後我們還要用一個 number 型別的變數拿來做疊加的紀錄值好更新我們自訂事件的回傳值
- 來到 onGameStart() 這裡,使用 setInterval 於每秒使用 emit 來更新這個自訂事件的回傳值
- 目前為止只需要輸出到外層元件去,因此我們需要透過@Output 把我們的 count 送出去,記得 count 是一個自訂事件
- 來到外層元件 app 這裡,設定一個自訂事件綁定,來呼喊 app 元件下的方法負責輸出工作,先用 console 來測試 Start 與 Pause 是否成功
<button (click)="onGameStart()">Start</button> |
import { Component, OnInit, EventEmitter, Output } from '@angular/core'; |
<app-game-ctl (count)="onGetCount($event)"></app-game-ctl> |
import { Component } from '@angular/core'; |
接下來根據要求,需要把值送到 Odd 與 Event 元件內由它們來負責輸出到畫面上。
- odd 與 even 元件代表的是一個 p 段落就好。由 app 來控制重複使用 even 與 odd 元件,先嘗試各別都只有完成一個元素,因為要接受來是外部元件所以要用到
@Input - 來到 Odd 與 Even,來創造一個可訪問的
@input屬性,同時這個屬性變數會提供給範本 html 使用,透過字串差值來輸出畫面。 - 來到 app 元件這裡,我們會跑回圈重複使用下層元件 Odd 與 Even,既然是迴圈就必須要把數字存成陣列。且還要把數字弄成屬性綁定要提供給下層各元件使用。
- 最後是強型別的問題,注意 app 那裏的數字陣列如何宣告,以及 Odd 與 Even 的屬性強行別,因為不想弄初始值會報錯,所以用斷言符號強迫一定是數字。
- 目前跑起來,兩邊底層元件都會跑 12345 有成功透過
@input將資料傳送進去。
<p>ODD - {{number}}</p> |
<p>EVEN - {{number}}</p> |
import { Component, Input } from '@angular/core'; |
import { Component, Input } from '@angular/core'; |
<app-game-ctl (count)="onGetCount($event)"></app-game-ctl> |
import { Component } from '@angular/core'; |
最後想辦法多個判斷式弄成兩個陣列給不同下層元件,利用餘數是否為 0 判斷奇偶數。
<app-game-ctl (count)="onGetCount($event)"></app-game-ctl> |
import { Component } from '@angular/core'; |
以及最後一小段要求,在這兩個小元件規劃 P 字色就好。
p { |
p { |
最後美中不足的是,如果 click 連續同一按會跑多次 interval 動作。所以多一個判斷是否給予按鈕禁用屬性。
<button (click)="onGameStart()" [disabled]="bool">Start</button> |
export class GameCtlComponent { |
完成如下
Directives 指令
目前為止,Angular 可探討出有三種 directive 指令,且部分 directive 已經使用過:
- 元件 - 包含 template 的 directive。
- 結構指令 - 通過添加和刪除 DOM 多數元素組合之結構,來更改 DOM 的佈局 View 方式。(如 ngFor、ngIf)
- 屬性指令 - 編寫在元素上面,就像屬性指定一樣。可改變本身元素,元件或其他指令的外觀或行為。(如 ngStyle)
使用結構指令
使用 github 資源包內的 lokiDirectives-start 作為環境,做一個結構指令的小試牛刀。在素材包當中,已持有一個 event 按鈕,透過 click 希望呈現單或雙的畫面切換。在 TS 內已存在一個 array,試著先輸出 li 清單畫面。
- 已知 numbers 為一個數字陣列。在 html 畫面上使用結構指令 ngFor 跑出
- 捨棄原本 ng-template 的測試用代碼,值得注意的是 ng-template 需要透過
[ngIf=*]來代表屬性控制個 template 是否執行。若是直接寫在 p 元素上才是使用*ngIf=*來指定是否生成。 - 對 li 規劃
*ngFor來跑陣列生成與內容 textContent。
import { Component } from '@angular/core'; |
<div class="container"> |
然而如果我們需要透過 click 去控制 li 只顯示單或雙,若直接考量 li 多添加一個結構指令* ngIf 來判別動作,會出現問題為
- 同一個元素不可以設定多個控制指令。 => Can’t have multiple template bindings on one element. Use only one attribute prefixed with *
- ngIf 無法讀取到 number 的值。 => Property ‘number’ does not exist on type ‘AppComponent’. Did you mean ‘numbers’?
<ul class="list-group"> |
因此我們需要調整一下做法:
- TS 這裡簡化了 array 資料處理,為了示意而貪快直接準備 2 個陣列。
- 將兩組結構指令規劃到不同的元素上。
export class AppComponent { |
<ul |
使用屬性指令
同樣快速使用屬性指令,舉例 ngStyle 與 ngClass。在 css 內規劃 odd 與 even 的樣式效果。
- ngClass 由於是指定給元素當作屬性,因此需要增加
[]裝飾,ngStyle 亦同。 - 在判別 ngClass 是否成立方式為
className:boolean,舉例指定 class 名稱為 odd 這個值的條件之下:,當 number 能夠不被 2 整除時成立。 - 在判別 ngStyle 是否成立方式為
cssAttrKey:value,舉例指定 backgroundColor 的 value 透過三元表達來獲取。
.odd { |
<ul |
自訂的屬性指令
建立一個自訂的屬性指令方式,探討一些操作自訂屬性指令的用法,同時探討這些屬性指令的使用時機。
透過 ElementRef 直接修改 DOM
ElementRef 是一個用於封裝原生 DOM 元素的類別。它可以讓您在元件中訪問和操作 DOM 元素,但通常不推薦直接使用它來操作 DOM,因為這樣可能會引起安全問題。ElementRef 是通過依賴注入(dependency injection)在元件中使用的。當一個元件需要訪問它所屬的 DOM 元素時,可以通過將 ElementRef 注入到該元件中來實現。
舉例
先手動建立所需的檔案,如同建立 Component 但我們這次要建立 Directive。
- 建立 class 並指定路徑檔案,檔名為 basic-hight-light.directive.ts
- 如果
@Component方式,建立@Directive並提供 selector 選擇器名稱為[basicHightLight],這裡使用[]裝飾是由於這會是一個 style 樣式要提供給指定 HTML 元素,提早在這裡打到時候元素上面就可以省略輸入[]。 - 然後規劃一個內部屬性為 elementRef,其 type 為 ElementRef,代表被指定的 HTML 元素。
- 當此 directive 被初始 init 時,透過 nativeElement 找到此元素的 style 參數之 backgroundColor 直接指定 value 值。
- 此時已完成 directive 設計,但需要將此 directive 掛載給 app.module 使得這份專案認得此 directive。
import { Directive, ElementRef, OnInit } from "@angular/core"; |
import { BasicHightLightDirective } from './basic-hight-light/basic-hight-light.directive'; |
然後,可以找到 html 位置添加一個 p 段落,並在元素上指定此屬性指令 basicHightLight(來自於 selector 的命名)來指定,已獲得結果為 style 背景色。
<p basicHightLight>Lorem ipsum dolor sit amet, consectetur adipisicing elit. Neque, architecto.</p> |
使用 Renderer2 渲染 DOM 對象
在 Angular 中,Renderer2 是一個用於將 DOM 操作與平台相分離的 API。它提供了一個抽象層,讓您可以在不同的平台上(如 Web 和 Native)使用相同的 API 來操縱 DOM。Renderer2 的主要用途是在不直接操作 DOM 的情況下,創建、修改和刪除 DOM 元素。它提供了一組方法,可以讓您在元件中動態創建、修改和刪除 DOM 元素,而不需要直接訪問 DOM API。這樣做的好處是可以提高應用程序的性能和安全性。
以下是一些常見的 Renderer2 方法:
- createElement(tagName: string): 創建一個新的 DOM 元素。
- createText(text: string): 創建一個新的文本節點。
- appendChild(parent: any, newChild: any): 在父元素中添加一個新的子元素。
- removeChild(parent: any, oldChild: any): 從父元素中刪除一個子元素。
- setStyle(el: any, style: string, value: any, flags?: RendererStyleFlags2): 設置元素的樣式屬性。
- addClass(el: any, name: string): 為元素添加一個 CSS 類。
使用 Renderer2 API 可以使您的代碼更具可移植性,因為它可以在不同的平台上運行,而不需要對平台特定的 DOM API 進行修改。這樣可以使您的應用程序更容易維護和升級。
舉例
這裡改用 ng 指令來自動完成建立所需的檔案為 better-high-light,同樣再另產生一組 Directive 利於對照。
## full command |
此時已產生指定目錄下的 directive 檔案,接著編寫 directive。
- 使用 Renderer2 並載入,與前面方一相同也需載入 ElementRef 元件。
- 與透過 ElementRef 直接修改 DOM 不同的是,這裡透過 render2 來操作 DOM,透過 setStyle 指定 ElementRef 完成 style 修改。
- 注意這裡的 selector 名稱自動被命名為
[appBetterHighLight]。 - appModule 已自動編寫宣告次 directive,直接到 app.component.html 做顯示。
import { ElementRef } from '@angular/core'; |
<p basicHightLight>Lorem ipsum dolor sit amet, consectetur adipisicing elit. Neque, architecto.</p> |
HostListener 監聽 DOM 對象
HostListener 是一個裝飾器,用於綁定 DOM 事件到元件的方法上。當事件發生時,綁定的方法會被觸發。HostListener 可以應用於元件的方法上,在下面的簡易範例代碼中,我們在 ExampleComponent 的 onClick 方法上使用了 HostListener 裝飾器,綁定了 click 事件。當點擊按鈕時,該方法會被調用,並且可以訪問 MouseEvent 對象。
import { Component, HostListener } from '@angular/core'; |
您可以使用第一個參數指定要綁定的事件名稱,並可以使用第二個參數傳遞一個可選的參數數組,其中包含要傳遞給方法的任何額外參數。HostListener 可以綁定任何標準的 DOM 事件名稱,以下是一些常見的 DOM 事件:
- click:當元素被單擊時觸發
- mousedown:當鼠標按下時觸發
- mouseup:當鼠標放開時觸發
- mouseover:當鼠標移動到元素上方時觸發
- mouseout:當鼠標移出元素時觸發
- mousemove:當鼠標在元素內移動時觸發
- keydown:當按下鍵盤上的任何鍵時觸發
- keyup:當放開鍵盤上的任何鍵時觸發
- input:當輸入字段的值更改時觸發
- change:當表單控件的值更改時觸發
- submit:當表單提交時觸發
- focus:當元素獲得焦點時觸發
- blur:當元素失去焦點時觸發
- scroll:當元素被滾動時觸發
- resize:當窗口或元素的大小更改時觸發
- 除了標準的 DOM 事件外,HostListener 還可以綁定自定義事件。需要注意的是,自定義事件名稱應該以字母開頭,並且應該避免與標準 DOM 事件名稱重複。
import { Component, HostListener } from '@angular/core'; |
在範例中,我們定義了一個名為 customEvent 的自定義事件,並在 ExampleComponent 的 onCustomEvent 方法上使用 HostListener 綁定了它。當該事件被觸發時,該方法會被調用,並且可以訪問 CustomEvent 對象。在 triggerCustomEvent 方法中,我們使用 ElementRef 訪問 DOM 元素,並手動觸發了自定義事件。
使用 HostListener 可以使您的代碼更具可讀性和可維護性,因為它將 DOM 事件和相應的事件處理程序方法放在一起。這樣也使得您可以輕鬆地添加和刪除事件處理程序,並且不需要在模板中進行冗長的事件綁定。
舉例
在素材範例上調整 better-high-light.directive 的代碼,試著增加滑鼠滑入滑出的 style 變換。
import { ElementRef, HostListener } from '@angular/core'; |
HostBinding 綁定 DOM 屬性
HostBinding 是一個裝飾器,它可以用於綁定 DOM 元素的屬性。使用 HostBinding,您可以將元素屬性綁定到元件中的屬性,當該屬性值發生更改時,元素的屬性值也會跟著更新。
範例中,我們使用@HostBinding裝飾器將 isExample 屬性綁定到 div 元素的 class 屬性。當 isExample 屬性值為 true 時,div 元素的 class 屬性值將包含 example 類。您還可以使用 @HostBinding 裝飾器綁定其他 DOM 元素的屬性,例如 style、id、title 等等。與 HostListener 一樣,HostBinding 也是一個方便的方法,可以幫助您更輕鬆地操作 DOM 元素屬性。
import { Component, HostBinding } from '@angular/core'; |
舉例
沿用素材,取消原本的 Render2 的方式,改用 HostBinging 來指定某個屬性,且這個屬性的值會被我們換掉。例如我們希望選到該元素的 style.backgroundColor 屬性,將值以 backgroundColor 變數方式遇到特定條件就替換此值。如此一來只要任何屬性套用此屬性指令,我們就綁定它的style.backgroundColor值為某字串內容(根據 event 事件我們給予兩種不同結果)。
import { ElementRef, HostBinding, HostListener } from '@angular/core'; |
Input 與 Directive 的共用別名技巧補充
先規劃一個具備 Input 與 Directive 的特定環境,先在此 Directive 環境中規劃 Input,這樣在指定 DOM 元素上使用 Directive 也可以從外部將指定值 Input 到此 Directive 內。
- 規劃兩組 Input 為 defaultColor 與 focusColor,是否預設指定值皆可,因屆時會由外部去提供新值。
- 替換各現場下應該出現的 Color,其中建議使用 onInit 才能正常捕捉到 Input 提供的新值 gray
- 至該 DOM 元素上,透過屬性的資料綁定規劃 Input。
import { ElementRef, HostBinding, HostListener, Input } from '@angular/core'; |
<p appBetterHighLight [defaultColor]="'gray'" [focusColor]="'yellow'">Lorem ipsum dolor sit amet, consectetur adipisicing elit. Neque, architecto.</p> |
目前以正常的運作出預設灰與高亮黃。開始得以解釋一些特別技巧:
Input 別名合併 Directive 名稱
input 可以指定一個別名,使得外部可以根據這個別名對應 input 為何。然而 delector selector 名稱與 input 別名是可以同一個,Angular 會聰明去理解這兩者的名稱對象。根據以下簡約後的寫法結果將一致不變化。
import { ElementRef, HostBinding, HostListener, Input } from '@angular/core'; |
<p |
屬性傳遞 string 的簡約
不論屬性綁定還是屬性指令,當因屬性綁定而有傳遞字串時,[]與''是可被簡化的,Angular 只會把它當作屬性綁定,並不會把它當作 DOM 原生元素之屬性來看待。
<p |
自訂的結構指令
在正式介紹之前,先討論在一些結構指令上出現了*符號,其代表的意義為何
關於*的使用時機
結構指令是一種特殊的指令,它用於根據特定的條件來創建、刪除或更新 DOM 元素。Angular 有三種內置的結構指令,它們是 ngIf、ngFor 和 ngSwitch。在 DOM 元素上,我們使用*符號綁定結構指令,這是因為這些指令會動態改變 DOM 元素的結構。使用符號可以告訴 Angular 在解析模板時,使用該指令創建、刪除或更新 DOM 元素。
例如:我們使用 ngIf 指令,並將其應用於 div 元素上。當 condition 變為 true 時,div 元素會被動態創建,當 condition 變為 false 時,div 元素則會被刪除。使用符號可以讓我們更容易地識別結構指令,並且可以簡化模板代碼。
<div *ngIf="condition">This div is shown if condition is true.</div> |
然而,當結構指令用於 ng-template 時,我們使用 [] 符號來綁定指令。這是因為 ng-template 通常用於創建複雜的模板結構,並且需要通過屬性綁定的方式來控制結構指令。
例如:我們使用[ngIf]語法來綁定 ng-template 的 ngIf 指令,並且在 ng-template 中創建 div 元素。當 condition 變為 true 時,div 元素將被動態創建,當 condition 變為 false 時,div 元素則會被刪除。使用[]符號可以讓我們更容易地識別屬性綁定,並且可以更好地控制結構指令的行為。
<ng-template [ngIf]="condition"> |
規劃結構指令
先建立 CLI 指令新生成一個 directive 檔案,會自動協助寫入到 app.module.ts 內。同時 selector 為 appUnless。
ng g d --skip-tests=true unless/unless |
ViewContainerRef
ViewContainerRef 是一個重要的類別,它表示了一個視圖容器的參照,該容器可以動態地創建、插入和移除視圖。一個 ViewContainerRef 實例通常代表一個 DOM 元素,我們可以通過它來動態地創建、插入和移除視圖。ViewContainerRef 提供了以下常用的方法:
createComponent(componentFactory: ComponentFactory<C>): ComponentRef<C>
此方法用於通過 ComponentFactory 創建一個新的元件,並將其添加到視圖容器中。({
selector: 'app-example',
template: '<ng-template #vc></ng-template>',
})
export class ExampleComponent {
('vc', { read: ViewContainerRef }) vc: ViewContainerRef;
constructor(private componentFactoryResolver: ComponentFactoryResolver) {}
createChildComponent() {
const componentFactory = this.componentFactoryResolver.resolveComponentFactory(ChildComponent);
const componentRef = this.vc.createComponent(componentFactory);
// do something with the componentRef
}
}insert(viewRef: ViewRef, index?: number): ViewRef
此方法用於在視圖容器的指定位置插入一個視圖。({
selector: 'app-example',
template: '<ng-template #vc></ng-template>',
})
export class ExampleComponent {
('vc', { read: ViewContainerRef }) vc: ViewContainerRef;
constructor(private componentFactoryResolver: ComponentFactoryResolver) {}
insertView(viewRef: ViewRef, index: number) {
this.vc.insert(viewRef, index);
}
}clear(): void
此方法用於從視圖容器中刪除所有視圖。ViewContainerRef 是 Angular 中一個非常強大的概念,可以用於實現動態的視圖創建和管理。在實現複雜的動態 UI 時,ViewContainerRef 是一個必不可少的工具。({
selector: 'app-example',
template: '<ng-template #vc></ng-template>',
})
export class ExampleComponent {
('vc', { read: ViewContainerRef }) vc: ViewContainerRef;
clearViews() {
this.vc.clear();
}
}
TemplateRef
TemplateRef 是一個非常重要的類別,它表示一個模板的參照,這個模板可以被動態地插入到視圖中。TemplateRef 通常是通過 ng-template 指令定義的模板,這個模板可以在結構指令中使用。一個 TemplateRef 實例通常代表一個包含 HTML 標記的模板,我們可以通過它來動態地插入這個模板的內容。TemplateRef 提供了以下常用的方法:
createEmbeddedView(context?: C): EmbeddedViewRef<C>
此方法用於創建一個 EmbeddedViewRef 實例,並將其插入到視圖中。該方法還可以接受一個可選的上下文對象,用於設置模板內部的變量。例如:({
selector: 'app-example',
template: `
<ng-template #template let-name="name">
<p>Hello, {{ name }}!</p>
</ng-template>
<ng-container *ngTemplateOutlet="template; context: { name: 'Alice' }"></ng-container>
`,
})
export class ExampleComponent {
('template', { read: TemplateRef }) template: TemplateRef<any>;
constructor(private vcRef: ViewContainerRef) {}
createEmbeddedView() {
const embeddedViewRef = this.template.createEmbeddedView({ name: 'Bob' });
this.vcRef.insert(embeddedViewRef);
}
}elementRef: ElementRef
此屬性返回模板中的根元素的 ElementRef 參照。該屬性通常用於從模板中訪問元素的屬性和方法。例如:TemplateRef 是 Angular 中一個非常重要的概念,它提供了動態模板創建和管理的能力。在實現複雜的動態 UI 時,TemplateRef 是一個必不可少的工具。({
selector: 'app-example',
template: `
<ng-template #template>
<p #message>Hello, world!</p>
</ng-template>
`,
})
export class ExampleComponent {
('template', { read: TemplateRef }) template: TemplateRef<any>;
createEmbeddedView() {
const embeddedViewRef = this.template.createEmbeddedView();
const messageElementRef = embeddedViewRef.rootNodes[0].querySelector('#message');
console.log(messageElementRef.nativeElement.innerText);
}
}
設計類似 ngIf 的自訂結構指令
總和以上兩處觀念,來設計類似 ngIf 的練習用結構指令。首先取消原素材的 ngIf 部分內容,改以*appUnless="!onlyOdd"來使用結構指令。
<!-- <ul |
接著根據以下步驟規劃 directive。
- 透過 Input 來獲取一個外部條件,在 html 上提供了 boolean 值來給予條件。這裡的@input 可以由上層原件來動態更改子元件的屬性值,但如果上層的數據產生變化,下層並不會自動更新。因此需要依賴 setter 方法來做監聽行為 (set 參數)。
- input 的變數名稱(以 set 方式)使用同 selector 名稱,如前面小節提到共用此名稱,如此一來就不需要多編寫屬性綁定。
- 當獲得 boolean 為 true,透過 ViewContainerRef 去要求產生插入到畫面上中,插入的容器也就是目前的 TemplateRef 本體。
- 反之 false,則銷毀這個容器餘畫面上。
import { Directive, Input, TemplateRef, ViewContainerRef } from '@angular/core'; |
ngSwitch 內建結構指令示範
這裡簡單示範 ngSwitch 的用途。可自行更改 values 值做 switchCase 的預期結果為何。
- 以屬性綁定的方式規劃 ngSwitch,不是用星號且與 values 進行綁定。
- 內層的 DOM 元素規劃
*ngSwitchCase做一個 case 的參考傳遞過來,使得條件成立時顯示。 - 若為 case default,則使用
*ngSwitchDefault
<div [ngSwitch]="values"> |
export class AppComponent { |
參考文獻
- Udemy Angular - The Complete Guide (2022 Edition) SESSION 5, 7