本篇一開始將利用 Vite 所產生的預設專案內容環境進行理解開發部屬流程。同時一邊詳細地基本介紹 React 相關基礎知識撰寫技巧。在這裡可以學習所需要的 React。本篇使用的版本為最新的 React 18,部分 API 與用途稍有不同且新穎。
了解專案環境 相較於 CDN 作法,我們已經不需要特別宣告載入 babel 來協助瀏覽器理解 JSX 寫什麼,vite 會協助我們轉換打包成瀏覽器能理解的代碼。練習方式請從前一篇的 vite 初始專案做說明開始動作。
根元件 由於 SPA 的設計,網頁只會載入根目錄下的index.html。接著透過 React 的語法,協助我們對瀏覽器下達 DOM API 相關操作指令。因此很清楚看到整個畫面只有一個 div#root 跟指定的/src/main.jsx。而這份 script 檔案就是 React 的所有起頭檔案。
index.html <!doctype html > <html lang ="en" > <head > <meta charset ="UTF-8" /> <link rel ="icon" type ="image/svg+xml" href ="/vite.svg" /> <meta name ="viewport" content ="width=device-width, initial-scale=1.0" /> <title > Vite + React</title > </head > <body > <div id ="root" > </div > <script type ="module" src ="/src/main.jsx" > </script > </body > </html >
副檔名 jsx 是為了讓 vite 知道這是一個含有 JSX 內容的 js 檔案需要特別解讀。如果你的代碼沒有任何 jsx 代碼,可以使用 js 為副檔名。
接著觀察/src/main.jsx,這是一隻使用 React 語法所寫的最上層根目錄的節點檔案。
在最上面的根元件建議宣告 StrictMode 包覆起來,這代表整個 React 往下都需要嚴謹模式。StrictMode 是 React 提供的一種檢查工具,會檢測過時的 API 並在控制台中顯示警告,以及使特定生命周期方法(如 componentDidMount 和 componentDidUpdate)運行兩次,以幫助檢測意外的副作用。
createRoot 是宣告建立一個整個 React 最上層的 Root 元件。而 ReactDOM 包含了可以將 React 元素渲染 Render 到瀏覽器的工具包。
React 的每一層元件都可以直接匯入 CSS,供該層使用,並且下層元件也能繼承這些 CSS。
Vite 支援省略 .jsx,它會自動匹配尋找 .js, .jsx, .json 檔案。
render 負責產生一個虛擬的 DOM 並渲染觀察它,並不是一開始存在的實 體 DOM。
/src/main.jsx import { StrictMode } from 'react' ; import { createRoot } from 'react-dom/client' ; import './index.css' ; import App from './App' ; createRoot (document .getElementById ('root' )).render ( <StrictMode > <App /> </StrictMode > );
根節點的建立方式createRoot(element).render(JSX),在 17 版本以前是ReactDOM.render(JSX,element),有所差異。React 17 開始,JSX 轉換已經改進,不再需要在每個文件中導入 React。
隨著把滑鼠放在<App />位置,透過 Ctrl +Click ,VSCode 會跳到該檔案上或這自己手動找到這份檔案,接著觀察此內容。React 都是用包覆的方式將元件設定於內部。因此 App 是 Main 的下層元件。每層元件都有自己的邏輯與渲染畫面方式。
App.jsx import { useState } from 'react' import reactLogo from './assets/react.svg' import viteLogo from '/vite.svg' import './App.css' function App ( const [count, setCount] = useState (0 ) return ( <> <div > <a href ="https://vite.dev" target ="_blank" > <img src ={viteLogo} className ="logo" alt ="Vite logo" /> </a > <a href ="https://react.dev" target ="_blank" > <img src ={reactLogo} className ="logo react" alt ="React logo" /> </a > </div > <h1 > Vite + React</h1 > <div className ="card" > <button onClick ={() => setCount((count) => count + 1)}> count is {count} </button > <p > Edit <code > src/App.jsx</code > and save to test HMR </p > </div > <p className ="read-the-docs" > Click on the Vite and React logos to learn more </p > </> ) } export default App
這份檔案上,可以看到:
有使用到一個 Hook 為 useState,這是一個狀態管理,晚點會正式詳細解釋。大致上他記錄 count 變化,隨著 onClick 觸發,將目前的 count+1,利用 setCount 存入。這樣 count 的會被動態記住而改變。
圖片可以當作一個模組來匯入使用。該元件的 css 也用匯入方式載入。
宣告一個 function,他會返回一個 JSX 代碼。然後這份檔案預設 default 的會把 function 結果輸出。讓上層 Main 取得這份元件的東西。
return 的東西永遠只有一個標籤,JSX 的特性就是可以編寫多個 HTML 標籤方式內容。如果硬要回傳多個 HTML 標籤,可以考慮多包一個<div>(但跟著會渲染出來),或者可以使用空標籤<> React 會自動不產生此 DOM,但回傳仍只有一個標籤。
並將練習的 React 檔案從src/index.js開始編寫,調整 html 請從public/index.html開始改寫。初始動作準備如下:
public/index.html <!DOCTYPE html > <html lang ="en" > <head > <meta charset ="UTF-8" > <meta http-equiv ="X-UA-Compatible" content ="IE=edge" > <meta name ="viewport" content ="width=device-width, initial-scale=1.0" > <title > Document</title > </head > <body > <div id ="root" > </div > </body > </html >
自動檢查與排版優化 眼尖可以看到 Vite 的原本代碼沒有指定;符號,同時排版上可能不是平時習慣的統一風格作法。我們可以借助 ESLint 與 Prettier 來完成專案的代碼一致性與減少錯誤發生。如果一個專案很多人共同維護開發,這時候的 ESLint 就是統一寫法的限制警告,而 Prettier 是強制在格式化時排成我們統一的寫法風格。
ESLint 在 Vite 的專案內,已經包含了 ESLint 的安裝與設定如下位置。用於檢查 JavaScript 代碼中的問題,包括潛在的錯誤和不良實踐。
eslint.config.js import js from '@eslint/js' import globals from 'globals' import react from 'eslint-plugin-react' import reactHooks from 'eslint-plugin-react-hooks' import reactRefresh from 'eslint-plugin-react-refresh' export default [ { ignores : ['dist' ] }, { files : ['**/*.{js,jsx}' ], languageOptions : { ecmaVersion : 2020 , globals : globals.browser , parserOptions : { ecmaVersion : 'latest' , ecmaFeatures : { jsx : true }, sourceType : 'module' , }, }, settings : { react : { version : '18.3' } }, plugins : { react, 'react-hooks' : reactHooks, 'react-refresh' : reactRefresh, }, rules : { ...js.configs .recommended .rules , ...react.configs .recommended .rules , ...react.configs ['jsx-runtime' ].rules , ...reactHooks.configs .recommended .rules , 'react/jsx-no-target-blank' : 'off' , 'react-refresh/only-export-components' : [ 'warn' , { allowConstantExport : true }, ], }, }, ]
但這樣不會根據 IDE 操作下被套入 ESLint 反饋告知,因此需要安裝 VSCode 套件,協助我們開發時根據專案下的 ESLint 去檢查。安裝 VSCode 的 ESLint
為了讓 VSCode 能夠正確地使用專案中的 ESLint 設定,我們需要在專案根目錄建立 .vscode/settings.json 檔案。這些設定會:
在儲存檔案時自動修復 ESLint 檢測到的問題(如果是 rule 內的要求下)
設定 ESLint 要驗證的檔案類型(JavaScript 和 JSX)
.vscode/settings.json { "editor.codeActionsOnSave" : { "source.fixAll.eslint" : "explicit" } , "eslint.validate" : [ "javascript" , "javascriptreact" ] }
記得要把.gitignore的.vscode/*註解取消,讓 git 記錄此設定跟著專案一起提交,其他人的 VSCode 也會下載後有相同規則。
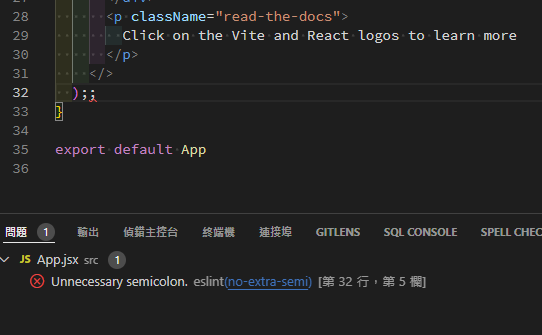
現在故意在src\App.jsx某處添加兩次;;,試圖產生錯誤的警告。
由於eslint.config.js 內沒有要求 ESLint 規則不能出現 2 次;;。我們需要補上禁止多餘的分號規則。
eslint.config.js rules : { ...js.configs .recommended .rules , ...react.configs .recommended .rules , ...react.configs ['jsx-runtime' ].rules , ...reactHooks.configs .recommended .rules , 'react/jsx-no-target-blank' : 'off' , 'react-refresh/only-export-components' : [ 'warn' , { allowConstantExport : true }, ], 'no-extra-semi' : 'error' },
現在回頭看src\App.jsx,就會出現錯誤提示了。
然後按下儲存。ESLint 就會幫我們自動修復了。
Prettier 用於自動格式化代碼,確保代碼風格的一致性。可以每次在 vscode 進行 format 時,強制格式化我們指定的排版樣式統一閱讀感。
首先安裝必要的套件與用途:
prettier: Prettier 核心套件
eslint-config-prettier: 關閉所有和 Prettier 衝突的 ESLint 規則
eslint-plugin-prettier: 讓 ESLint 運行 Prettier 規則
pnpm add -D prettier eslint-config-prettier eslint-plugin-prettier
-D是--save-dev的縮寫,用於將依賴保存到 devDependencies(開發依賴)中。這些套件只有開發模式下使用,不會用於產生模式。
接著在專案目錄下,再建立 .prettierrc 檔案:
.prettierrc { "semi" : true , "tabWidth" : 2 , "printWidth" : 100 , "singleQuote" : true , "trailingComma" : "es5" , "jsxSingleQuote" : false , "bracketSpacing" : true }
然後調整eslint.config.js,把 prettier 的相關套件綁給 ESLint。
eslint.config.js import js from '@eslint/js' ;import globals from 'globals' ;import react from 'eslint-plugin-react' ;import reactHooks from 'eslint-plugin-react-hooks' ;import reactRefresh from 'eslint-plugin-react-refresh' ;import prettier from 'eslint-plugin-prettier' ; export default [ { ignores : ['dist' ] }, { files : ['**/*.{js,jsx}' ], languageOptions : { ecmaVersion : 2020 , globals : globals.browser , parserOptions : { ecmaVersion : 'latest' , ecmaFeatures : { jsx : true }, sourceType : 'module' , }, }, settings : { react : { version : '18.3' } }, plugins : { react, 'react-hooks' : reactHooks, 'react-refresh' : reactRefresh, prettier, }, rules : { ...js.configs .recommended .rules , ...react.configs .recommended .rules , ...react.configs ['jsx-runtime' ].rules , ...reactHooks.configs .recommended .rules , 'react/jsx-no-target-blank' : 'off' , 'react-refresh/only-export-components' : ['warn' , { allowConstantExport : true }], 'no-extra-semi' : 'error' , 'prettier/prettier' : 'error' , }, }, ];
因為 Prettier 會自動處理分號相關的格式問題,讓 Prettier 完全接管程式碼格式化的工作。所以我們不需要 ESLint 去檢查與格式化有關的規則。
然後我們還要調整一下 setting.json。讓格式化工具都是使用 Prettier
.vscode\settings.json { "editor.codeActionsOnSave" : { "source.fixAll.eslint" : "explicit" } , "eslint.validate" : [ "javascript" , "javascriptreact" ] , "editor.formatOnSave" : true , "editor.defaultFormatter" : "esbenp.prettier-vscode" , }
現在存檔時,都能自動根據我們的 prettier 的設定自動調整喜好的格式。
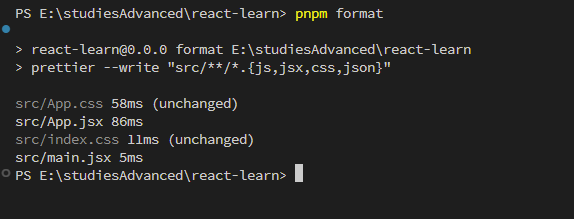
如果想一口氣把整個 vite 都格式化。我們可以添加腳本來處理。對package.json追加腳本指令。
package.json { "scripts" : { "format" : "prettier --write \"src/**/*.{js,jsx,css,json}\"" } }
然後輸入指令 pnpm format,根據腳本要求,把 src 目錄以下的所有指定檔案進行 format。
現在整個 Vite 預設檔案都是你固定的格式了。
基礎觀念 接下來正式學習一些基礎的 React 寫法。
JSX 語法 JSX 如前面已介紹,在 React 能夠方便的在 JavaScript 內直接寫入 HTML 標籤,使得 React 能透過 Babel 或 SWC 來偵測自動編譯成 JavaScript DOM API。JSX 有一定的規則與寫法。如果有大量 html 需轉換 JSX,可以利用官方提供的 線上轉換器 。
JSX 比 HTML 更嚴格。您必須關閉諸如 之類的標籤<br />。
JSX 允許巢狀複合 JSX,但一個 JSX 只能一個標籤。例如 const myBr = <br /><br />;是錯誤的寫法。
一個元件只能傳回一個元素。多個並排元素情況您必須將它們包裝到上層元素或使用片段元件 Fragment,例如一個<div>...</div>或一個空的<>...</>標籤
變數、運算符、帶回傳之函式等各種需夾任何表達式都能以{}包覆。也可以把 JSX 語法成為一個變數。
由於 JSX 是 JS 語言,因此插入的變數可以是物件,所以{{}}的寫法在 style 屬性上,代表插入一個物件屬性。
{}可以放任何變數、物件。理所當然物件的屬性指向值.也可以自由應用。若要代表 HTML 屬性,JSX 大多為同樣的寫法,但由於 JSX 是一種 JS 語言,因此在屬性上寫法有以下小注意:
某些 JavaScript 保留字需要改用其他名稱,例如 class 要改用 className、for 要改用 htmlFor
事件處理屬性採用駝峰式命名,例如 onclick 要改為 onClick、onsubmit 要改為 onSubmit
data-* 屬性保持原有的 kebab-case 寫法,例如 data-id、data-test-id 等
component 的 return 地方只能一行代碼返回 JSX,如果因 JSX 有多行代碼,可以用()來包覆一個複合的 HTML 標籤。
JSX 空標籤<></>是代表原語法<Fragment></Fragment>的快速縮寫。但注意<>不可以持有 key,需要改用<Fragment key={yourKey}>...</Fragment>傳遞 key。
將App.jsx試圖調整,我們可以完成以下內容:
src/index.js import { useState } from 'react' ;import reactLogo from './assets/react.svg' ;import viteLogo from '/vite.svg' ;import './App.css' ;export default function App ( const [count, setCount] = useState (0 ); const myBr = <br /> const imgVite = <img src ={viteLogo} className ="logo" alt ="Vite logo" /> const imgReact = <img src ={reactLogo} className ="logo react" alt ="React logo" /> const h1Title = 'Vite + React' ; const h1Element = <h1 data-id ="123" > {h1Title}</h1 > return ( <> <div > <a href ="https://vite.dev" target ="_blank" > {imgVite} </a > {myBr} <a href ="https://react.dev" target ="_blank" > {imgReact} </a > </div > {h1Element} <div className ="card" > <button onClick ={() => setCount((count) => count + 1)}>count is {count}</button > <p > Edit <code > src/App.jsx</code > and save to test HMR </p > </div > <p className ="read-the-docs" > Click on the Vite and React logos to learn more</p > </> ); }
Render 渲染 React 的元素使用 JSX 來編寫形成一個物件,而瀏覽器的元素 node 是實體 DOM。如想要將元素物件塞到實體 DOM 做成 UI 畫面,就必須透過ReactDOM.js的特定函式createRoot來達到渲染。要注意的是,這個寫法從 React 18+ 開始使用,17 以前的寫法並不是這樣寫。可以觀察main.jsx了解。
src\main.jsx import { StrictMode } from 'react' ;import { createRoot } from 'react-dom/client' ;import './index.css' ;import App from './App' ;createRoot (document .getElementById ('root' )).render ( <StrictMode > <App /> </StrictMode > );
如果想要在兩處實體 DOM 做內容動態渲染,邏輯是相同的。
index.html <body > <div id ="root" > </div > <div id ="foot" > </div > <script type ="module" src ="/src/main.jsx" > </script > </body >
src\main.jsx createRoot (document .getElementById ('root' )).render ( <StrictMode > <App /> </StrictMode > ); createRoot (document .getElementById ('foot' )).render (<h1 > hello world</h1 >
Component 元件 React 應用程式是由元件組成的。元件是 UI(使用者介面)的一部分,具有自己的資料邏輯和顯示外觀。元件可以小到一個按鈕,也可以大到整個頁面。
使用 function 的方式建立元件,以大寫字母開頭。這就是你知道它是一個 React 元件的方式。 React 元件名稱必須始終以大寫字母開頭,而 HTML 標籤必須小寫。
舊版 React 能選擇使用 Class 類別來建立元件(具備生命週期觀念),不過大多數現在都是使用 function 搭配 Hook 來建立,相對簡單又快速便利。
元件透過回傳 jsx 來決定顯示虛擬 DOM,同時也可以巢狀嵌套別的元件,形成上下層元件關係。
定義多個 function 元件位置最好扁平化,不可以在定義 function 元件內部,巢狀的新定義一個元件。這些元件要串接上下層都是靠 JSX 來編寫指定。
請嘗試把原App.jsx的 LOGO 區域獨立為一個元件,內部再獨立出各自兩組超連結與圖片改為元件:
src\App.jsx import { useState } from 'react' ;import reactLogo from './assets/react.svg' ;import viteLogo from '/vite.svg' ;import './App.css' ;const alts = { vite : 'Vite Logo' , react : 'React Logo' , }; function ImgA ( return <img src ={viteLogo} className ="logo" alt ={alts.vite} /> } function LinkA ( return ( <a href ="https://vite.dev" target ="_blank" > <ImgA /> </a > ); } function ImgB ( return <img src ={reactLogo} className ="logo react" alt ={alts.react} /> } function LinkB ( return ( <a href ="https://react.dev" target ="_blank" > <ImgB /> </a > ); } function MyLogo ( const myBr = <br /> return ( <div > <LinkA > </LinkA > {myBr} <LinkB /> </div > ); } export default function App ( const [count, setCount] = useState (0 ); const h1Title = 'Vite + React' ; const h1Element = <h1 data-id ="123" > {h1Title}</h1 > return ( <> <MyLogo /> {h1Element} <div className ="card" style ={{ color: 'red ', background: 'black ' }}> <button onClick ={() => setCount((count) => count + 1)}>count is {count}</button > <p > Edit <code > src/App.jsx</code > and save to test HMR </p > </div > <p className ="read-the-docs" > Click on the Vite and React logos to learn more</p > </> ); }
設計 Component 元件命名時必需一定是大寫開頭,這是避免在 JSX 內編寫時與小寫開頭的 HTML 元素混淆衝突,例如<Div />與<div />前者是元件後者是 HTML 標籤。
傳遞資料 props 概念上來說,component 就像是 JS 的 function,它接收任意的參數(稱之為「props」)並且回傳描述畫面的 React element。如果這個元件有提供屬性參數會以 props 物件方式來保留,用途廣泛的傳遞資料於內外存取屬性。例如我們對外部元件設定添加myname=Loki,便能在內部元件利用此 props 來獲得進行應用。舉例使用 JSX 的{}表達式來插入 props 物件之變數:
例如,剛剛的範例我們可以把 Img 的 src 值與 alt 值,利用 props 來傳遞給元件。但此時應該會出現 ESLint 的錯誤。
src\App.jsx import { useState } from 'react' ;import reactLogo from './assets/react.svg' ;import viteLogo from '/vite.svg' ;import './App.css' ;function ImgA (props ) { return <img src ={props.logo} className ="logo" alt ={props.txt} /> } function LinkA ( return ( <a href ="https://vite.dev" target ="_blank" > <ImgA logo ={viteLogo} txt ="Vite Logo" /> </a > ); } function ImgB ({ logo, txt } ) { return <img src ={logo} className ="logo" alt ={txt} /> } function LinkB ( return ( <a href ="https://react.dev" target ="_blank" > <ImgB logo ={reactLogo} txt ="React Logo" /> </a > ); } function MyLogo ( const myBr = <br /> return ( <div > <LinkA > </LinkA > {myBr} <LinkB /> </div > ); } export default function App ( const [count, setCount] = useState (0 ); const h1Title = 'Vite + React' ; const h1Element = <h1 data-id ="123" > {h1Title}</h1 > return ( <> <MyLogo /> {h1Element} <div className ="card" style ={{ color: 'red ', background: 'black ' }}> <button onClick ={() => setCount((count) => count + 1)}>count is {count}</button > <p > Edit <code > src/App.jsx</code > and save to test HMR </p > </div > <p className ="read-the-docs" > Click on the Vite and React logos to learn more</p > </> ); }
由於 Vite 的環境有 ESLint 而檢查預設開啟,因此我們必需對這兩個錯誤的元件定義 props 的別以及是否必存在。透過套件 prop-types 來導入使用。
src\App.jsx import PropTypes from 'prop-types' ;function ImgA (props ) { return <img src ={props.logo} className ="logo" alt ={props.txt} /> } ImgA .propTypes = { logo : PropTypes .string .isRequired , txt : PropTypes .string , }; function LinkA ( return ( <a href ="https://vite.dev" target ="_blank" > <ImgA logo ={viteLogo} txt ="Vite Logo" /> </a > ); } function ImgB ({ logo, txt } ) { return <img src ={logo} className ="logo" alt ={txt} /> } ImgB .propTypes = { logo : PropTypes .string .isRequired , txt : PropTypes .string , }; function LinkB ( return ( <a href ="https://react.dev" target ="_blank" > <ImgB logo ={reactLogo} txt ="React Logo" /> </a > ); }
當然你可以關閉 ESLint 對 props 型別的檢查,大多數現在的新專案都會使用 TypeScript 來開發輔助錯誤檢查。只有以前的舊專案,在沒有導入 TypeScript 又需要輔助檢查錯誤時才可能利用去 props-types 做檢查。
eslint.config.js rules : { ...js.configs .recommended .rules , ...react.configs .recommended .rules , ...react.configs ['jsx-runtime' ].rules , ...reactHooks.configs .recommended .rules , 'react/jsx-no-target-blank' : 'off' , 'react-refresh/only-export-components' : ['warn' , { allowConstantExport : true }], 'no-extra-semi' : 'error' , 'prettier/prettier' : 'error' , 'react/prop-types' : 'off' , },
現在不需要 props-type 也不會發生錯誤了。
組合 Component 小元件本身可重複利用的,在另一個大元件內利用 JSX 編寫重複使用,再透過 props 獲得差異性的顯示。例如我們的 ImgA 跟 ImgB 有類似的 UI 可以組合為 MyImg。
src\App.jsx function MyImg ({ logo, txt } ) { return <img src ={logo} className ="logo" alt ={txt} /> } function LinkA ( return ( <a href ="https://vite.dev" target ="_blank" > <MyImg logo ={viteLogo} txt ="Vite Logo" /> </a > ); } function LinkB ( return ( <a href ="https://react.dev" target ="_blank" > <MyImg logo ={reactLogo} txt ="React Logo" /> </a > ); } function MyLogo ( const myBr = <br /> return ( <div > <LinkA > </LinkA > {myBr} <LinkB /> </div > ); }
可以挑戰看看把 LinkA 跟 LinkB 也組合為 MyLink。
src\App.jsx function MyImg ({ logo, txt } ) { return <img src ={logo} className ="logo" alt ={txt} /> } function MyLink ({ logo, txt, link } ) { return ( <a href ={link} target ="_blank" > <MyImg logo ={logo} txt ={txt} /> </a > ); } function MyLogo ( const myBr = <br /> return ( <div > <MyLink logo ={viteLogo} txt ="Vite Logo" link ="https://vite.dev" > </MyLink > {myBr} <MyLink logo ={reactLogo} txt ="React Logo" link ="https://react.dev" /> </div > ); }
如果需要,也可以把資料獨立出來(未來可能資料來自於後端提供 API 回傳)成為一個資料陣列。透過物件方式傳遞下去,這樣就不用寫一堆 props 了。但見仁見智,React 的寫法很自由。
src\App.jsx function MyImg ({ imgItem } ) { return <img src ={imgItem.img} className ="logo" alt ={imgItem.name} /> } function MyLink ({ linkItem } ) { return ( <a href ={linkItem.url} target ="_blank" > <MyImg imgItem ={linkItem} /> </a > ); } function MyLogo ( const myBr = <br /> const dataList = [ { name : 'Vite Logo' , img : viteLogo, url : 'https://vite.dev' , }, { name : 'React Logo' , img : reactLogo, url : 'https://react.dev' , }, ]; return ( <div > <MyLink linkItem ={dataList[0]} > </MyLink > {myBr} <MyLink linkItem ={dataList[1]} /> </div > ); }
匯出匯入 元件的神奇之處在於它們的可重複使用性:您可以建立由其他元件組成的元件。但是,當您嵌套越來越多的元件時,開始將它們拆分為不同的檔案通常是有意義的。這使您可以輕鬆掃描文件並在更多地方重複使用元件。您可以透過三個步驟移動元件:
建立一個新的 JS 檔案來放入元件。
從該文件導出函式元件(使用預設導出或命名導出)。
將其匯入到您將使用該元件的檔案中(使用匯入預設或命名匯出的相應技術)。
試著將 MyLogo 與 MyLink 獨立成檔案,在適合的地方匯入:
如果發生大量的Delete ␍錯誤,這是換行符號(line ending)的問題。這個錯誤通常出現在 Windows 系統上,因為 Windows 使用 CRLF (\r\n),而 Unix/Linux 使用 LF (\n)。右下角可以切換本檔案使用哪種,或者在.vscode\settings.json 追加"files.eol": "\n",使得每次新增檔案預設為 LF 格式。
src\App.jsx import { useState } from 'react' ;import './App.css' ;import MyLogo from './component/MyLogo/MyLogo' ; export default function App ( }
src\component\MyLogo\MyLogo.jsx import reactLogo from './../../assets/react.svg' ;import viteLogo from '/vite.svg' ;import { MyLink } from './MyLink' ; export default function MyLogo ( const myBr = <br /> const dataList = [ { name : 'Vite Logo' , img : viteLogo, url : 'https://vite.dev' , }, { name : 'React Logo' , img : reactLogo, url : 'https://react.dev' , }, ]; return ( <div > <MyLink linkItem ={dataList[0]} > </MyLink > {myBr} <MyLink linkItem ={dataList[1]} /> </div > ); }
src\component\MyLogo\MyLink.jsx function MyImg ({ imgItem } ) { return <img src ={imgItem.img} className ="logo" alt ={imgItem.name} /> } export function MyLink ({ linkItem } ) { return ( <a href ={linkItem.url} target ="_blank" > <MyImg imgItem ={linkItem} /> </a > ); }
如果路徑變得越來越複雜,也可以用別名路徑來定義。例如常用的 assets 目錄設定一個別名起頭 import reactLogo from '@assets/react.svg';。跟隨以下設定與新增vite.config.js:
vite.config.js import { defineConfig } from 'vite' ;import react from '@vitejs/plugin-react-swc' ;export default defineConfig ({ plugins : [react ()], resolve : { alias : { '@assets' : '/src/assets' , }, }, });
渲染列表 JSX 支援元件陣列方式作為渲染,如果有任何資料需要提供元件,我們可以用 JS array 的原生方法來操作批次輸出多個元件。
React 支援元件陣列的寫法。React 會自動了解陣列內容,以迴圈方式多筆輸出在畫面上:
src\component\MyLogo\MyLogo.jsx export default function MyLogo ( const myBr = <br /> const dataList = [ { name : 'Vite Logo' , img : viteLogo, url : 'https://vite.dev' , }, { name : 'React Logo' , img : reactLogo, url : 'https://react.dev' , }, ]; return ( <div > {[<MyLink linkItem ={dataList[0]} > </MyLink > , <MyLink linkItem ={dataList[1]} /> ]}</div > ); }
如果此時查看 console 會出現錯誤資訊
MyLogo.jsx:28 Warning: Each child in a list should have a unique "key" prop.

Check the render method of `MyLogo`. See https://reactjs.org/link/warning-keys for more information.
    at MyLink (http://localhost:5173/src/component/MyLogo/MyLink.jsx:23:26)
    at MyLogo
    at App (http://localhost:5173/src/App.jsx?t=1738305513593:18:31)
這是因為 React 需要 key 來識別列表中的每個元素,以便在列表發生資料更新時,能夠正確地被動進行重新渲染更新或刪除已存在的畫面元素。key 是幫助 React 進行識別用而不是給開發人員使用的。用途為判斷哪些元素被改變(新增修改刪除),有以下特性:
每個元素的 key 都必須在同個陣列內要有唯一性才能讓 React 去追蹤這些元素。只要確保 render 該指定陣列時能透過 key 判斷出此陣列底下的這些獨立元素。
key 的指定為在 JSX 元素上透過屬性來賦予(類似 props 方式),但是你無法讀取此值,即便 props.key 也做不到。
這樣可以幫助 React 更好地管理列表中的元素,並避免一些常見的錯誤。通常會使用資料(來自 SQL 提供) 的 id 來辦定。目前沒有 id 情況下可以手動選擇代表性且不重複的資料為值,但不要使用 array index 來當作值,因為索引值不能代表該資料的識別唯一值。修正如下:
src\component\MyLogo\MyLogo.jsx export default function MyLogo ( const myBr = <br /> const dataList = [ { id : 1 , name : 'Vite Logo' , img : viteLogo, url : 'https://vite.dev' , }, { id : 2 , name : 'React Logo' , img : reactLogo, url : 'https://react.dev' , }, ]; return ( <div > {[ <MyLink key ={dataList[0].id} linkItem ={dataList[0]} > </MyLink > , <MyLink key ={dataList[1].id} linkItem ={dataList[1]} /> , ]} </div > ); }
同時,也可以對資料陣列利用 map 方式轉換為元件陣列。
src\component\MyLogo\MyLogo.jsx export default function MyLogo ( const myBr = <br /> const dataList = [ { id : 1 , name : 'Vite Logo' , img : viteLogo, url : 'https://vite.dev' , }, { id : 2 , name : 'React Logo' , img : reactLogo, url : 'https://react.dev' , }, ]; return dataList.map ((val ) => <MyLink key ={val.id} linkItem ={val} /> }
每一個元件函式都必須保持乾淨的過程與結果輸出,由於元件是可以重複利用的。透過 props 來提供相同的輸入傳遞,並始終返回相同的 JSX。
作為 children 傳遞 任何被元件包覆起來的元件或內容都被視為 children props,我們可以用來接受並使用,形成由上層提供至下層進行管理渲染的做法。例如我們在上層決定 children 是什麼,下層去取得自己的 children 做指定渲染。您可以將帶有 prop 的元件 children 視為具有洞口,其父元件可以使用任意 JSX 來填充。經常會使用 children 道具來進行視覺包裝:面板、格子等等。
src\component\MyH1\MyH1.jsx const MyH1 = ({ children } ) => <h1 > {children}</h1 > export default MyH1 ;
src\App.jsx import { useState } from 'react' ;import './App.css' ;import MyLogo from './component/MyLogo/MyLogo' ;import MyH1 from './component/MyH1/MyH1' ;export default function App ( const [count, setCount] = useState (0 ); const h1Title = 'Vite + React' ; return ( <> <MyLogo /> {/* {h1Element} //捨棄 */} <MyH1 > {h1Title}</MyH1 > {/*由此處上層決定 children 是什麼*/} <div className ="card" style ={{ color: 'red ', background: 'black ' }}> <button onClick ={() => setCount((count) => count + 1)}>count is {count}</button > <p > Edit <code > src/App.jsx</code > and save to test HMR </p > </div > <p className ="read-the-docs" > Click on the Vite and React logos to learn more</p > </> ); }
互動性 畫面上的某些內容會根據使用者輸入事件進行更新。例如 click 或 change value,在 React 中,隨時間操作變化的資料稱為 state 狀態。您可以為任何 component 元件新增 state 狀態,並根據需要更新它。在本章中,您將學習如何編寫處理互動、更新其狀態並隨時間顯示不同輸出的元件。
Events 事件 在 React 內對某 HTML 元素綁訂一個事件,可透過 JSX 來編寫。整體寫法與 HTML DOM 的事件寫法雷同,但有以下差異性:
React Events 採用駝峰式命名(如onClick為例),與 HTML (如onclick為例) 原有屬性 events 屬性標籤做差異。
綁定事件執行某函式,React 的 events 值只需要寫該函式名稱或指定一匿名函式即可;HTML 則是直接寫 JS 語法字串。
src\component\MyButton\MyButton.jsx const handleClick = (console .log ('is click event!!' );const MyButton = ({ children } ) => <button onClick ={handleClick} > {children}</button > export default MyButton ;
src\App.jsx import { useState } from 'react' ;import './App.css' ;import MyLogo from './component/MyLogo/MyLogo' ;import MyH1 from './component/MyH1/MyH1' ;import MyButton from './component/MyButton/MyButton' ;export default function App ( const [count, setCount] = useState (0 ); const h1Title = 'Vite + React' ; return ( <> <MyLogo /> <MyH1 > {h1Title}</MyH1 > <div className ="card" style ={{ color: 'red ', background: 'black ' }}> <MyButton > Click Me!</MyButton > {/*追加此行*/} <button onClick ={() => setCount((count) => count + 1)}>count is {count}</button > <p > Edit <code > src/App.jsx</code > and save to test HMR </p > </div > <p className ="read-the-docs" > Click on the Vite and React logos to learn more</p > </> ); }
React 不接受 return false 的方式來取消 events 事件(但 HTML DOM 可以,如onsumbit="return false"為例),因此需透過 preventDefault 來取消預定事件動作。
src\component\MyForm\MyForm.jsx import MyButton from '../MyButton/MyButton' ;const MyForm = ( const handleSubmit = (e ) => { e.preventDefault (); console .log ('submit' ); }; const handelChangeText = (e ) => { console .log (e.target .value ); }; return ( <form onSubmit ={handleSubmit} > <input type ="text" placeholder ="請輸入內容" onChange ={handelChangeText} /> <MyButton > 提交</MyButton > <hr /> </form > ); }; export default MyForm ;
src\App.jsx import MyForm from './component/MyForm/MyForm' ;export default function App ( const [count, setCount] = useState (0 ); const h1Title = 'Vite + React' ; return ( <> <MyLogo /> <MyH1 > {h1Title}</MyH1 > <div className ="card" style ={{ color: 'red ', background: 'black ' }}> <MyForm /> {/*追加此行*/} <MyButton > Click Me!</MyButton > <button onClick ={() => setCount((count) => count + 1)}>count is {count}</button > <p > Edit <code > src/App.jsx</code > and save to test HMR </p > </div > <p className ="read-the-docs" > Click on the Vite and React logos to learn more</p > </> ); }
通常一些團隊會要求資料處理由上層負責,下層只負責基本的渲染與執行。因此我們可以把事件動作搬移至上層,而上層可以命名喜好的名稱函式,上層不管哪種 event 事件,只管要發生甚麼事。
src\component\MyForm\MyForm.jsx import MyButton from '../MyButton/MyButton' ;const MyForm = ({ onLokiSubmit, onLokiChange } ) => { return ( <form onSubmit ={onLokiSubmit} > <input type ="text" placeholder ="請輸入內容" onChange ={onLokiChange} /> <MyButton > 提交</MyButton > <hr /> </form > ); }; export default MyForm ;
src\App.jsx export default function App ( const [count, setCount] = useState (0 ); const h1Title = 'Vite + React' ; const onPasswordSubmit = (e ) => { e.preventDefault (); console .log ('submit' ); }; const onPasswordChange = (e ) => { console .log (e.target .value ); }; return ( <> <MyLogo /> <MyH1 > {h1Title}</MyH1 > <div className ="card" style ={{ color: 'red ', background: 'black ' }}> <MyForm onLokiSubmit ={onPasswordSubmit} onLokiChange ={onPasswordChange} /> <MyButton > Click Me!</MyButton > <button onClick ={() => setCount((count) => count + 1)}>count is {count}</button > <p > Edit <code > src/App.jsx</code > and save to test HMR </p > </div > <p className ="read-the-docs" > Click on the Vite and React logos to learn more</p > </> ); }
State 狀態管理 我們是使用 React 來協助我們對瀏覽器畫面進行控制,因此不能使用 JS 觀念認為我們可以用一般變數去控制 DOM 畫面重新變化。React 就像汽車雨刷器,當偵測到畫面需要更動時,才會進行畫面重新渲染,我們需要讓 React 知道什麼時候發生了狀態改變。React 提供了一些內建 Hook 來協助溝通。此時要學到的是 useState。
在 Vite 初始模板上有看到const [count, setCount] = useState(0);的使用,可以看出一些用法:
useState() 的參數作為初始時,我們可以定義一開始數字為 0
useState 會返回一個陣列,透過解構第一個會是讀取 state 當下的值定義為 count 變數,第二個會是可以修改值的方法,定義為setCount()函式。
我們可以顯示當下的 count 為多少,如count is {count}為例,而綁定一個 click 事件,試圖對當下 count+1 的結果放入到setCount()內。
當 React 感覺到 setCount 有更動,他會去自行觸發畫面需要重新渲染所需要的新畫面。
src\App.jsx import { useState } from 'react' ;export default function App ( const [count, setCount] = useState (0 ); return ( <> <MyLogo /> <MyH1 > {h1Title}</MyH1 > <div className ="card" style ={{ color: 'red ', background: 'black ' }}> <MyForm onLokiSubmit ={onPasswordSubmit} onLokiChange ={onPasswordChange} /> <MyButton > Click Me!</MyButton > <button onClick ={() => setCount((count) => count + 1)}>count is {count}</button > {/*重點處*/} <p > Edit <code > src/App.jsx</code > and save to test HMR </p > </div > <p className ="read-the-docs" > Click on the Vite and React logos to learn more</p > </> ); }
我們嘗試新規劃一個狀態管理作為我們的幻燈片操作。
src\component\MyGallery\data.js const data = [ { title : 'Lorem ipsum dolor. A' , url : 'https://picsum.photos/300/200/?random=10' , }, { title : 'Lorem ipsum dolor. B' , url : 'https://picsum.photos/300/200/?random=11' , }, { title : 'Lorem ipsum dolor. C' , url : 'https://picsum.photos/300/200/?random=12' , }, { title : 'Lorem ipsum dolor. D' , url : 'https://picsum.photos/300/200/?random=13' , }, ]; export default data;
src\component\MyGallery\MyGallery.jsx import { useState } from 'react' ;import data from './data.js' ;const MyGallery = ( const [idx, setIdx] = useState (0 ); const handlePrev = ( const newCount = (idx + data.length - 1 ) % data.length ; setIdx (newCount); }; const handleNext = ( setIdx ((idx ) => (idx + data.length + 1 ) % data.length ); }; return ( <div style ={{ display: 'flex ', flexDirection: 'column ', justifyContent: 'center ', padding: '20px ', border: '1px solid ', }} > <div style ={{ marginBottom: '10px ' }}> <button onClick ={handlePrev} > prev</button > <button onClick ={handleNext} > next</button > </div > <img src ={data[idx].url} style ={{ display: 'block ' }} /> <label > {data[idx].title}</label > </div > ); }; export default MyGallery ;
src\App.jsx import MyGallery from './component/MyGallery/MyGallery' ;export default function App ( return ( <> <MyLogo /> <MyH1 > {h1Title}</MyH1 > <MyGallery /> {/*重點處*/} <div className ="card" style ={{ color: 'red ', background: 'black ' }}> <MyForm onLokiSubmit ={onPasswordSubmit} onLokiChange ={onPasswordChange} /> <MyButton > Click Me!</MyButton > <button onClick ={() => setCount((count) => count + 1)}>count is {count}</button > <p > Edit <code > src/App.jsx</code > and save to test HMR </p > </div > <p className ="read-the-docs" > Click on the Vite and React logos to learn more</p > </> ); }
一個元件可以多個 state 管理,我們多控制一個 boolean 是否要顯示 title。
src\component\MyGallery\MyGallery.jsx import { useState } from 'react' ;import data from './data.js' ;const MyGallery = ( const [idx, setIdx] = useState (0 ); const [toShow, setToShow] = useState (true ); const handleControl = (todo ) => { switch (todo) { case 'next' : setIdx ((idx ) => (idx + data.length + 1 ) % data.length ); break ; case 'prev' : setIdx ((idx ) => (idx + data.length - 1 ) % data.length ); break ; } }; return ( <div style ={{ display: 'flex ', flexDirection: 'column ', justifyContent: 'center ', padding: '20px ', border: '1px solid ', }} > <div style ={{ marginBottom: '10px ' }}> <button onClick ={() => handleControl('prev')}>prev</button > <button onClick ={() => setToShow((bool) => !bool)}>{toShow ? 'hide' : 'show'}</button > <button onClick ={() => handleControl('next')}>next</button > </div > <img src ={data[idx].url} style ={{ display: 'block ' }} /> {toShow && <label > {data[idx].title}</label > } </div > ); }; export default MyGallery ;
你可以利用 JSX 的{}來插入一個複合邏輯並根據特性true && element將回傳 element,而false && element則回傳 false 之技巧,做一個簡易具備行內判斷的 JSX。注意:如果 JSX 出現{false}之表達結果代表忽略。
如果 App 元件重複使用 MyGallery 元件時,它們的 state 是彼此獨立不共享。如果希望這兩個元件共用同樣的 state,其作法是由上層負責 state,透過 prop 傳遞給下層使用。
src\component\MyGallery\MyGallery.jsx import { useState } from 'react' ;import data from './data.js' ;const MyGallery = ({ toShow, setToShow } ) => { const [idx, setIdx] = useState (0 ); const handleControl = (todo ) => { switch (todo) { case 'next' : setIdx ((idx ) => (idx + data.length + 1 ) % data.length ); break ; case 'prev' : setIdx ((idx ) => (idx + data.length - 1 ) % data.length ); break ; } }; return ( <div style ={{ display: 'flex ', flexDirection: 'column ', justifyContent: 'center ', padding: '20px ', border: '1px solid ', }} > <div style ={{ marginBottom: '10px ' }}> <button onClick ={() => handleControl('prev')}>prev</button > <button onClick ={() => setToShow((bool) => !bool)}>{toShow ? 'hide' : 'show'}</button > <button onClick ={() => handleControl('next')}>next</button > </div > <img src ={data[idx].url} style ={{ display: 'block ' }} /> {toShow && <label > {data[idx].title}</label > } </div > ); }; export default MyGallery ;
src\App.jsx import { useState } from 'react' ;import MyGallery from './component/MyGallery/MyGallery' ;export default function App ( const [count, setCount] = useState (0 ); const [toShow, setToShow] = useState (true ); return ( <> <MyLogo /> <MyH1 > {h1Title}</MyH1 > <MyGallery toShow ={toShow} setToShow ={setToShow} /> <MyGallery {... { toShow , setToShow }} /> {/*兩種寫法,如果故意同名可以用解構來速寫*/} <div className ="card" style ={{ color: 'red ', background: 'black ' }}> <MyForm onLokiSubmit ={onPasswordSubmit} onLokiChange ={onPasswordChange} /> <MyButton > Click Me!</MyButton > <button onClick ={() => setCount((count) => count + 1)}>count is {count}</button > <p > Edit <code > src/App.jsx</code > and save to test HMR </p > </div > <p className ="read-the-docs" > Click on the Vite and React logos to learn more</p > </> ); }
參考文獻