
React 依賴 Status 去管理多層元件下的渲染時機,以及利用 props 由上層去傳遞下層做資料取得。隨著元件複雜化,有些事情變得很繁瑣,因此我們需要額外了解 Context 與 Reducer 的應用。
Context
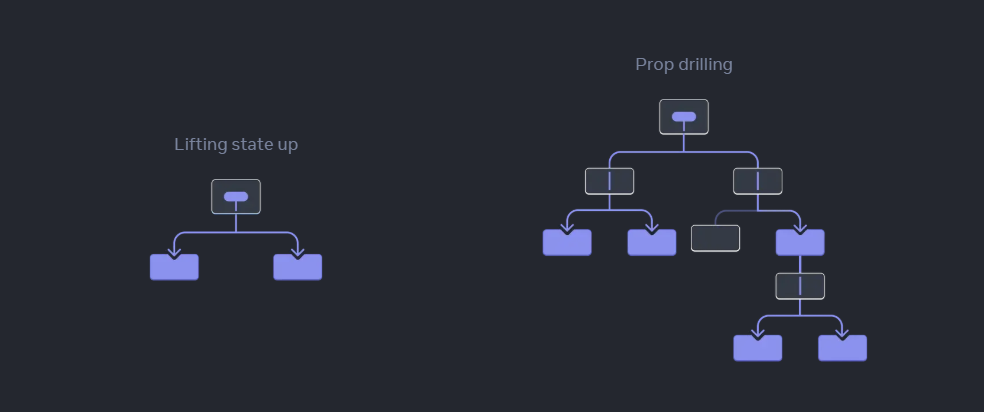
通常,你會透過 props 將訊息從父元件傳遞到子元件。但是,如果您必須透過中間的許多元件傳遞它們,或者如果您的應用程式中的許多元件都需要相同的訊息,那麼傳遞 props 可能會變得冗長且不方便。上下文允許父元件向其下方樹中的任何元件提供一些資訊 - 無論其深度如何 - 而無需透過 props 明確傳遞它。
透過官方的圖片說明可以了解到,當父層級元件管理大家的 status 時,隨著子孫層元件要使用 status 的值,勢必會透過 props 來取得與操作。如之前章節範例幻燈片來說。兩個下層會透過 props 去連接父層的 status,但如果層級一多。每層都需要傳遞一個個往下傳。
部屬與取得
使用createContext創造一個上下文特定元件,你可以 create 初期指定預設值,或者透過 value 改變值。放置在任何一個主元件上並包覆起來。該主元件的任何子孫層元件都能隨時取得此 Context 的 value 值。不需要透過 props 來傳遞。
以本例來說:
- 我們在 MyContext 主元件規劃一個 createContext 並命名為 ThemeContext。
- 接著,將主元件內的子元件使用 Provider 包覆起來,在這裡指定 ThemeContext 給予新值 。此時 ThemeContext 值被更新。
- 而 MyContextLv1 這層我們不需要使用到 Context 也沒有任何 props 需傳遞,直接規劃下一層 MyContextLv2。
- MyContextLv2 希望讀取到主元件當時指定的 ThemeContext 值,能透過 hook 的 useContext 抽取出值,形成了不需要 props 就能從主元件拿到值。
src\App.jsximport { Routes, Route } from 'react-router';
import Layout from './template/layout';
import Base from './pages/lesson01/base';
import MyContext from './pages/lesson02/myContext';
export default function App() {
return (
<Routes>
<Route element={<Layout />}>
<Route index element={<Base />} />
<Route path="base" element={<Base />} />
<Route path="lesson02" element={<MyContext />}>
<Route path="my-context" element={<MyContext />} />
</Route>
</Route>
</Routes>
);
}
|
src\template\layout.jsxexport default function Layout() {
return (
<>
<nav>
<h2>選單</h2>
<ul>
<li>
<NavLink to="/base">基礎學習</NavLink>
</li>
<li>
<NavLink to="/lesson02/my-context">Context Sample 1</NavLink>
</li>
</ul>
</nav>
<main>
<div className="container">
<Outlet />
</div>
<footer>本專案為 Loki Jiang 課程教材使用</footer>
</main>
</>
);
}
|
src\pages\lesson02\myContext.jsximport { createContext, useContext } from 'react';
const themes = {
light: {
foreground: '#000000',
background: '#eeeeee',
},
dark: {
foreground: '#ffffff',
background: '#222222',
},
};
const ThemeContext = createContext(themes.dark);
const MyContext = () => (
<>
<ThemeContext.Provider value={themes.dark}>
<MyContextLv1 />
</ThemeContext.Provider>
</>
);
const MyContextLv1 = () => <MyContextLv2 />;
const MyContextLv2 = () => {
const theme = useContext(ThemeContext);
return (
<button style={{ background: theme.background, color: theme.foreground }}>
I am styled by theme context!
</button>
);
};
export default MyContext;
|
取得與重複修改
接著看另一個案例,先設計一個巢狀選單,並多規劃一個路由。
- 增加一路由,期望為
http://localhost:5173/lesson02/my-list-menu,並追加選單連結。
- 規劃 MyListMenu 元件,透過巢狀資料陣列產生下層 MyItem 元件,並透過 props 把 data 資料傳遞下去。
- 根據必要性追加 MyListMenu CSS。
- MyItem 使用 data 取得,由於每一個元件取得 data 不相同,不適合 Context 方式獲取。
- MyItem 根據有無下層資料,決定呼喚 MyItem 為下層。
- MyItem 規劃 state 控制是否顯示下層選單。
src\App.jsximport { Routes, Route } from 'react-router';
import Layout from './template/layout';
import Base from './pages/lesson01/base';
import MyContext from './pages/lesson02/myContext';
import MyListMenu from './pages/lesson02/myListMenu';
export default function App() {
return (
<Routes>
<Route element={<Layout />}>
<Route index element={<Base />} />
<Route path="base" element={<Base />} />
<Route path="lesson02">
<Route index element={<MyContext />} />
<Route path="my-context" element={<MyContext />} />
<Route path="my-list-menu" element={<MyListMenu />} />
</Route>
</Route>
</Routes>
);
}
|
src\template\layout.jsximport { Link, Outlet, NavLink } from 'react-router';
import './layout.css';
export default function Layout() {
return (
<>
<nav>
<h2>選單</h2>
<ul>
<li>
<NavLink to="/base">基礎學習</NavLink>
</li>
<li>
<NavLink to="/lesson02/my-context">Context Sample 1</NavLink>
</li>
<li>
<NavLink to="/lesson02/my-list-menu">Context Sample Menu</NavLink>
</li>
</ul>
</nav>
<main>
<div className="container">
<Outlet />
</div>
<footer>本專案為 Loki Jiang 課程教材使用</footer>
</main>
</>
);
}
|
src\pages\lesson02\myListMenu.jsximport { useState } from 'react';
import MyItem from './myItem';
import './myListMenu.css';
const listData = [
{
name: 'Menu A',
child: [
{ name: 'Menu 1' },
{ name: 'Menu 2' },
{ name: 'Menu 3', child: [{ name: 'Menu I' }, { name: 'Menu II' }, { name: 'Menu III' }] },
],
},
{
name: 'Menu B',
child: [
{ name: 'Menu 1' },
{ name: 'Menu 2' },
{ name: 'Menu 3', child: [{ name: 'Menu I' }, { name: 'Menu II' }, { name: 'Menu III' }] },
],
},
{
name: 'Menu C',
child: [
{ name: 'Menu 1' },
{ name: 'Menu 2' },
{ name: 'Menu 3', child: [{ name: 'Menu I' }, { name: 'Menu II' }, { name: 'Menu III' }] },
],
},
];
const MyListMenu = () => {
return (
<ul>
{listData.map((obj) => (
<MyItem key={obj.name} data={obj} />
))}
</ul>
);
};
export default MyListMenu;
|
src\pages\lesson02\myListMenu.cssbutton {
display: inline;
border: 1px solid black;
padding: 0;
border-radius: 5px;
width: 1.5rem;
height: 1.5rem;
margin-left: 1rem;
}
|
src\pages\lesson02\myItem.jsximport { useState } from 'react';
const MyItem = ({ data }) => {
const [showChild, setShowChild] = useState(true);
return (
<li>
<span>{data.name}</span>
{data.child?.length && (
<button onClick={() => setShowChild((bool) => !bool)}>{showChild ? '+' : '-'}</button>
)}
{showChild && data.child?.length > 0 && (
<ul>
{data.child.map((obj) => (
<MyItem key={obj.name} data={obj} />
))}
</ul>
)}
</li>
);
};
export default MyItem;
|
接著規劃,每個 li 文字大寫從 3rem 開始,隨著往下一層,讀取 3 並除 1.2 之後,回存 Context,讓下一層拿到改變後的 Context 值,以此類推不斷減少。
- 新的 Context,我們獨立一個檔案放置。初始我們設定為 3
- 第一層 MyListMenu 我們沒有要改變 Context 值,可以不用去使用 Context。
- 第二層 MyItem 我們讀取出來,設為指定 li 文字大小,在往下層渲染之前,將值改變。
- 第三層跟著以此類推,拿到新值、套用、在下層渲染之前改變下一個新值。
src\pages\lesson02\FontSizeContext.jsimport { createContext } from 'react';
export const FontSizeContext = createContext('3');
|
src\pages\lesson02\myItem.jsximport { useContext } from 'react';
import { useState } from 'react';
import { FontSizeContext } from './FontSizeContext';
const MyItem = ({ data }) => {
const [showChild, setShowChild] = useState(true);
const fzVal = useContext(FontSizeContext);
return (
<li>
<span style={{ fontSize: fzVal + 'rem' }}>{data.name}</span>
{data.child?.length && (
<button onClick={() => setShowChild((bool) => !bool)}>{showChild ? '+' : '-'}</button>
)}
{showChild && data.child?.length > 0 && (
<FontSizeContext.Provider value={fzVal / 1.5}>
<ul>
{data.child.map((obj) => (
<MyItem key={obj.name} data={obj} />
))}
</ul>
</FontSizeContext.Provider>
)}
</li>
);
};
export default MyItem;
|
發生 CSS 全局汙染
由於我們規劃了 button 樣式效果,此時檢查 lesson01 任何畫面。可以發現我們的 css 影響到全局而汙染。這是因為 React 預設把所有 CSS 都提升到 head style 產生全局影響。因此建議的方式除了改用行內樣式,你也可以把特定 css 檔案設計成使用 CSS Modules,好處為 React 預設會產生 hash 亂碼,使得使用的 class 有唯一值不重複。重新調整如下:
- 評估
myListMenu.css 影響範圍只有 MyItem 元件,故改名並追加 module 必要關鍵字眼,例如 myItem.module.css
- 修改 css 的 selector,不能直接以 element 為 selector 方式,故改用
.btn
- 移除原本在 MyListMenu 的 import css 而改到 MyItem 元件匯入,注意寫法差異多一個
import style from
- 特定的元素位置上使用 className 載入 style 模組的指定 selector,例如
className={style.btn}
src\pages\lesson02\myItem.module.css.btn {
display: inline;
border: 1px solid black;
padding: 0;
border-radius: 5px;
width: 1.5rem;
height: 1.5rem;
margin-left: 1rem;
}
|
src\pages\lesson02\myItem.jsximport { useContext } from 'react';
import { useState } from 'react';
import { FontSizeContext } from './FontSizeContext';
import style from './myItem.module.css';
const MyItem = ({ data }) => {
const [showChild, setShowChild] = useState(true);
const fzVal = useContext(FontSizeContext);
return (
<li>
<span style={{ fontSize: fzVal + 'rem' }}>{data.name}</span>
{data.child?.length && (
<button className={style.btn} onClick={() => setShowChild((bool) => !bool)}>
{showChild ? '+' : '-'}
</button>
)}
{showChild && data.child?.length > 0 && (
<FontSizeContext.Provider value={fzVal / 1.5}>
<ul>
{data.child.map((obj) => (
<MyItem key={obj.name} data={obj} />
))}
</ul>
</FontSizeContext.Provider>
)}
</li>
);
};
export default MyItem;
|
此時檢查瀏覽器的代碼檢視,可以發現特定的 class 都有隨機的後綴 hash 值,確保不會影響全部同名的 class name。結論來說,凡是透過 moduleCSS 取回的 style,其物件的 key 都已經自帶 hash。
Reducer
Reducer 的主要功能是將複雜的 state 存取轉化為公式化的形式,讓開發者能夠更容易地管理和維護應用程式的狀態。透過 Reducer,我們可以將狀態的變化轉化為一系列的動作,從而實現更好的狀態管理和應用程式的可預測性。
ToDo List 基礎設計
為了更好解釋,我們嘗試編寫一個 ToDo List,利用現成版型 How To Create a To Do List 做成 React 版型,請注意以下要點:
- 增加一路由,期望為
http://localhost:5173/lesson02/todo-list,並追加選單連結。
- JS 邏輯請勿全部參考,應避免使用 for 而是使用 map,以及真實從 state 內刪除資料而不是使用 div.style.display 方式處理。
src\App.jsximport { Routes, Route } from 'react-router';
import Layout from './template/layout';
import Base from './pages/lesson01/base';
import MyContext from './pages/lesson02/myContext';
import MyListMenu from './pages/lesson02/myListMenu';
import TodoList from './pages/lesson02/todoList';
export default function App() {
return (
<Routes>
<Route element={<Layout />}>
<Route index element={<Base />} />
<Route path="base" element={<Base />} />
<Route path="lesson02">
<Route index element={<MyContext />} />
<Route path="my-context" element={<MyContext />} />
<Route path="my-list-menu" element={<MyListMenu />} />
<Route path="todo-list" element={<TodoList />} />
</Route>
</Route>
</Routes>
);
}
|
src\template\layout.jsximport { Link, Outlet, NavLink } from 'react-router';
import './layout.css';
export default function Layout() {
return (
<>
<nav>
<h2>選單</h2>
<ul>
<li>
<NavLink to="/base">基礎學習</NavLink>
</li>
<li>
<NavLink to="/lesson02/my-context">Context Sample 1</NavLink>
</li>
<li>
<NavLink to="/lesson02/my-list-menu">Context Sample Menu</NavLink>
</li>
<li>
<NavLink to="/lesson02/todo-list">ToDo List</NavLink>
</li>
</ul>
</nav>
<main>
<div className="container">
<Outlet />
</div>
<footer>本專案為 Loki Jiang 課程教材使用</footer>
</main>
</>
);
}
|
src\pages\lesson02\todoList\index.jsxconst TodoList = () => {
return null;
};
export default TodoList;
|
規劃 html 與 css 的單一元件
將 html 與 css 拆成適合 React 的 JSX 跟 CSS Module。
src\pages\lesson02\todoList\index.jsximport style from './todoList.module.css';
const TodoList = () => {
return (
<>
<div className={style.header}>
<h2>My To Do List</h2>
<input type="text" id="myInput" placeholder="Title..." />
<span className={style.addBtn}>Add</span>
</div>
<ul className={style.todoList}>
<li>Hit the gym</li>
<li className={style.checked}>Pay bills</li>
<li>Meet George</li>
<li>Buy eggs</li>
<li>Read a book</li>
<li>Organize office</li>
</ul>
</>
);
};
export default TodoList;
|
src\pages\lesson02\todoList\todoList.module.cssul.todoList {
margin: 0;
padding: 0;
li {
cursor: pointer;
position: relative;
padding: 12px 8px 12px 40px;
list-style-type: none;
background: #eee;
font-size: 18px;
transition: 0.2s;
user-select: none;
&:nth-child(odd) {
background: #f9f9f9;
}
&:hover {
background: #ddd;
}
&.checked {
background: #888;
color: #fff;
text-decoration: line-through;
&::before {
content: '';
position: absolute;
border-color: #fff;
border-style: solid;
border-width: 0 2px 2px 0;
top: 10px;
left: 16px;
transform: rotate(45deg);
height: 15px;
width: 7px;
}
}
}
}
.close {
position: absolute;
right: 0;
top: 0;
padding: 12px 16px 12px 16px;
&:hover {
background-color: #f44336;
color: white;
}
}
.header {
background-color: #f44336;
padding: 30px 40px;
color: white;
text-align: center;
&:after {
content: '';
display: table;
clear: both;
}
input {
margin: 0;
border: none;
border-radius: 0;
width: 75%;
padding: 10px;
float: left;
font-size: 16px;
}
}
.addBtn {
padding: 10px;
width: 25%;
background: #d9d9d9;
color: #555;
float: left;
text-align: center;
font-size: 16px;
cursor: pointer;
transition: 0.3s;
border-radius: 0;
&:hover {
background-color: #bbb;
}
}
|
資料陣列化
將 li 的文字組合成資料陣列,我們需要一個 text 紀錄 string,也還需要一個 checked 來記錄 boolean。別忘了還需要一個 id 作為 key。
- 透過 map 將資料轉為 JSX 元素。
- 順便將
<span className={style.close}>×</span>補在 li 內。
src\pages\lesson02\todoList\index.jsximport style from './todoList.module.css';
const initData = [
{
id: 1,
text: 'Hit the gym',
checked: false,
},
{
id: 2,
text: 'Pay bills',
checked: true,
},
{
id: 3,
text: 'Meet George',
checked: false,
},
{
id: 4,
text: 'Buy eggs',
checked: false,
},
{
id: 5,
text: 'Read a book',
checked: false,
},
{
id: 6,
text: 'Organize office',
checked: false,
},
];
const TodoList = () => {
return (
<>
<div className={style.header}>
<h2>My To Do List</h2>
<input type="text" id="myInput" placeholder="Title..." />
<span className={style.addBtn}>Add</span>
</div>
<ul className={style.todoList}>
{initData.map((item) => (
<li key={item.id} className={item.checked ? style.checked : null}>
{item.text}
<span className={style.close}>×</span>
</li>
))}
</ul>
</>
);
};
export default TodoList;
|
規劃互動
由於我們要對資料 CRUD 可以進行新增刪除打勾的事件,以及需要考量 useState 管理資料,使得畫面渲染。
Read
規劃一個 state 必需放在元件內部。他能讀取來自 state 的資料。
src\pages\lesson02\todoList\index.jsx
const TodoList = () => {
const [list, setList] = useState(initData);
return (
<>
<div className={style.header}>
<h2>My To Do List</h2>
<input type="text" id="myInput" placeholder="Title..." />
<span className={style.addBtn}>Add</span>
</div>
<ul className={style.todoList}>
{list.map((item) => ( // key point
<li
key={item.id}
className={item.checked ? style.checked : null}
>
{item.text}
<span className={style.close}>×</span>
</li>
))}
</ul>
</>
);
};
|
Create
試圖讓 input 的值可以被 Add Button 觸發事件,這兩個元素是平行的以及隨著輸入能清空文字,與渲染快照有關,最好的方式多用一個 state 來共享資源。
- 以及每次新增我們都需要讓 id 疊加。根據資料最後一筆來決定添加的 id 為多少,這個 id 可以偷懶不用 state 管理,因為畫面上沒有用到 id。
- text State 作為讀寫的用途。記得每次寫入資料都是用解構方式完成,這能保證記憶體不受汙染。
- 每一次的文字輸入都把 text 更新,確保都是最新的 text,所以需要用 onChange 事件。
- 在 Add Button 上面試圖呼叫 onClick 的 handle 事件,同時防呆無效的提交。
- 最後在 handle 上,試圖把新的 item 整合放入到 list 內。
src\pages\lesson02\todoList\index.jsx
const TodoList = () => {
const [list, setList] = useState(initData);
const [text, setText] = useState('');
const handleAdd = (text) => {
setList((data) => {
return [
...data,
{
id: list[list.length - 1].id + 1,
text: text,
checked: false,
},
];
});
};
return (
<>
<div className={style.header}>
<h2>My To Do List</h2>
<input
type="text"
id="myInput"
placeholder="Title..."
value={text}
onChange={(e) => setText(e.target.value)}
/>
<span
className={style.addBtn}
onClick={() => {
if (text === '') return;
handleAdd(text);
setText('');
}}
>
Add
</span>
</div>
<ul className={style.todoList}>
{list.map((item) => (
<li
key={item.id}
className={item.checked ? style.checked : null}
>
{item.text}
<span className={style.close}>×</span>
</li>
))}
</ul>
</>
);
};
|
Delete
刪除的工作很簡單,透過 id 尋找到指定 item,可以利用 array filter 過濾掉不要的 item。返回的會是新 array,不影響記憶體汙染。
src\pages\lesson02\todoList\index.jsxconst TodoList = () => {
const [list, setList] = useState(initData);
const [text, setText] = useState('');
const handleAdd = (text) => {
};
const handleDelete = (id) => {
setList((data) => data.filter((item) => item.id !== id));
};
return (
<>
<div className={style.header}>
<h2>My To Do List</h2>
<input
type="text"
id="myInput"
placeholder="Title..."
value={text}
onChange={(e) => setText(e.target.value)}
/>
<span
className={style.addBtn}
onClick={() => {
if (text === '') return;
handleAdd(text);
setText('');
}}
>
Add
</span>
</div>
<ul className={style.todoList}>
{list.map((item) => (
<li
key={item.id}
className={item.checked ? style.checked : null}
>
{item.text}
<span className={style.close} onClick={() => handleDelete(item.id)}>
×
</span>
</li>
))}
</ul>
</>
);
};
|
Update
更新的只有當下 item 的 checked boolean 值,我們可以在 JSX 上進行 handle 之前,把新資料準備好再提交 handle 去。而 handle 的工作就是替換掉現有 list 內的舊 item 資料,這部分用 map 即可完成。
src\pages\lesson02\todoList\index.jsxconst TodoList = () => {
const [list, setList] = useState(initData);
const [text, setText] = useState('');
const handleAdd = (text) => {
};
const handleDelete = (id) => {
};
const handleChecked = (newItem) => {
setList((data) =>
data.map((item) => {
return item.id === newItem.id ? newItem : item;
})
);
};
return (
<>
<div className={style.header}>
<h2>My To Do List</h2>
<input
type="text"
id="myInput"
placeholder="Title..."
value={text}
onChange={(e) => setText(e.target.value)}
/>
<span
className={style.addBtn}
onClick={() => {
if (text === '') return;
handleAdd(text);
setText('');
}}
>
Add
</span>
</div>
<ul className={style.todoList}>
{list.map((item) => (
<li
key={item.id}
className={item.checked ? style.checked : null}
onClick={() =>
handleChecked({
...item,
checked: !item.checked,
})
}
>
{item.text}
<span className={style.close} onClick={() => handleDelete(item.id)}>
×
</span>
</li>
))}
</ul>
</>
);
};
|
拆分元件
拆分元件有效把工作分配清楚,保持上層負責資料處理,下層負責顯示畫面。透過 props 把 state 的值傳遞下去,而 handle 事件則傳遞 fn 下去,使得下層能向上執行本層函式。大致上就完成了無難度。
src\pages\lesson02\todoList\component\taskAdd.jsximport { useState } from 'react';
import style from '../todoList.module.css';
const TaskAdd = ({ onAdd }) => {
const [text, setText] = useState('');
return (
<>
<input
type="text"
id="myInput"
placeholder="Title..."
value={text}
onChange={(e) => setText(e.target.value)}
/>
<span
className={style.addBtn}
onClick={() => {
if (text === '') return;
onAdd(text);
setText('');
}}
>
Add
</span>
</>
);
};
export default TaskAdd;
|
src\pages\lesson02\todoList\component\taskList.jsximport style from '../todoList.module.css';
const TaskList = ({ items, onDelete, onChecked }) => {
return (
<ul className={style.todoList}>
{items.map((item) => (
<li
key={item.id}
className={item.checked ? style.checked : null}
onClick={() =>
onChecked({
...item,
checked: !item.checked,
})
}
>
{item.text}
<span className={style.close} onClick={() => onDelete(item.id)}>
×
</span>
</li>
))}
</ul>
);
};
export default TaskList;
|
src\pages\lesson02\todoList\index.jsximport { useState } from 'react';
import style from './todoList.module.css';
import TaskAdd from './component/taskAdd';
import TaskList from './component/taskList';
const initData = [
{
id: 1,
text: 'Hit the gym',
checked: false,
},
{
id: 2,
text: 'Pay bills',
checked: true,
},
{
id: 3,
text: 'Meet George',
checked: false,
},
{
id: 4,
text: 'Buy eggs',
checked: false,
},
{
id: 5,
text: 'Read a book',
checked: false,
},
{
id: 6,
text: 'Organize office',
checked: false,
},
];
const TodoList = () => {
const [list, setList] = useState(initData);
const handleAdd = (text) => {
setList((data) => {
return [
...data,
{
id: list[list.length - 1].id + 1,
text: text,
checked: false,
},
];
});
};
const handleDelete = (id) => {
setList((data) => data.filter((item) => item.id !== id));
};
const handleChecked = (newItem) => {
setList((data) =>
data.map((item) => {
return item.id === newItem.id ? newItem : item;
})
);
};
return (
<>
<div className={style.header}>
<h2>My To Do List</h2>
<TaskAdd onAdd={handleAdd} />
</div>
<TaskList items={list} onDelete={handleDelete} onChecked={handleChecked} />
</>
);
};
export default TodoList;
|
ToDo List 整合 Reducer 設計
隨著 CRUD 需求的增加,我們對於 setList 的操作有了多樣化的需求。當元件的規模逐步擴大時,這些寫在 handle 內的邏輯就會變得不易維護和管理。這時候,Reducer 就能夠發揮作用,作為一個溝通的橋樑,任何想對 State 進行存取或修改的操作,都能夠通過 Reducer 來完成。這樣不僅能夠簡化代碼,提高代碼的可讀性和可維護性,還能夠讓代碼更加模組化和可重用。
解釋
useReducer 是一個 React hook 功能,他類似 useState 的使用觀念,持有一個整個 store 的觀念,store 的邏輯可以分為:
- 需提供一個 Reducer function 定義,該定義會根據哪種 action 要求,對資料進行修改。只有 reducer 才能對 store 內的資料修改。
- 須提供一個初始資料,讓 Reducer 一開始的 initState 內容為何。
- 會返回一個目前 store 的資料為何,用於畫面上。如果 store 更新了,React 會重新快照部屬。
- 會返還 dispatch 方法,方便我們對 reducer 下達指令。
- 同上,操作 dispatch,我們需要 action 指令,以及提供必要的資料。reducer 會根據哪種 action 觸發工作。
這是 useReducer 的指令範例:
import { useReducer } from 'react';
const [state, dispatch] = useReducer(reducerFn, initState);
|
調整 ToDo
跟著步驟,逐步幫 useState 轉換為 useReducer 使用。
- 取消原本的 useState 替換成 useReducer
- useReducer 需要先提供定義 reducerFn 跟 initState。因此調整 initData 更名為 initState,並移動位置到 useReducer 之前。
- reducerFn,會提供兩個參數 state 是目前 store 內的資料,action 是觸發的指令要求,返回是更新為新的 state 回到 store,先暫定 return null。
src\pages\lesson02\todoList\index.jsxconst TodoList = () => {
const reducerFn = (state, action) => {
return null;
};
const initState = [
{ id: 1, text: 'Hit the gym', checked: false,},
{ id: 2, text: 'Pay bills', checked: true,},
{ id: 3, text: 'Meet George', checked: false,},
{ id: 4, text: 'Buy eggs', checked: false,},
{ id: 5, text: 'Read a book', checked: false,},
{ id: 6, text: 'Organize office', checked: false,},
];
const [state, dispatch] = useReducer(reducerFn, initState);
}
|
接著,由於 reducerFn 處理的結果是要對 store 內的的 state 資料重新改變,因此把原本 handle 的事件分離成請求代碼與資料改變的代碼。
- action 基本會包含一個 type 是指令名稱,其他 props 都是設計者在操作 dispatch 時會附上,因此稍晚我們會決定 dispatch 要提供什麼。
- 我們可以先暫訂寫好三個動作 CUD 對 State 什麼事情,透過 switch 來決定哪個 action 對 state 做怎樣的修改。
src\pages\lesson02\todoList\index.jsxconst TodoList = () => {
const reducerFn = (list, action) => {
switch (action.type) {
case 'add todo': {
return [
...list,
{
id: action.id,
text: action.text,
checked: false,
},
];
}
case 'delete todo': {
return list.filter((item) => item.id !== action.id);
}
case 'checked todo': {
return list.map((item) => (item.id === action.item.id ? action.item : item));
}
default: {
throw Error('Unknown action: ' + action.type);
}
}
};
}
|
回到 ToDo 這裡,我們使用了 useReducer,也定義好了 reducerFn 跟 initState。他會返回 state, dispatch 給我們使用。
- dispatch 就是要發送給 reducer 的操作碼。我們要指定 action 名稱跟夾帶的 props,因此原本拆開的 handle 內容清空,只留下請求 dispatch。
- state 就是 store 資料的現況,替換原本從 useState 拿到的 list,換成從 useReducer 拿到的 state。
src\pages\lesson02\todoList\index.jsxconst TodoList = () => {
const reducerFn = (state, action) => {
switch (action.type) {
case 'add todo': {
return [
...state,
{
id: action.id,
text: action.text,
checked: false,
},
];
}
case 'delete todo': {
return state.filter((item) => item.id !== action.id);
}
case 'checked todo': {
return state.map((item) => (item.id === action.item.id ? action.item : item));
}
default: {
throw Error('Unknown action: ' + action.type);
}
}
};
const initState = [
{ id: 1, text: 'Hit the gym', checked: false },
{ id: 2, text: 'Pay bills', checked: true },
{ id: 3, text: 'Meet George', checked: false },
{ id: 4, text: 'Buy eggs', checked: false },
{ id: 5, text: 'Read a book', checked: false },
{ id: 6, text: 'Organize office', checked: false },
];
const [state, dispatch] = useReducer(reducerFn, initState);
const handleAdd = (text) => {
dispatch({
type: 'add todo',
id: state[state.length - 1].id + 1,
text: text,
checked: false,
});
};
const handleDelete = (id) => {
dispatch({
type: 'delete todo',
id,
});
};
const handleChecked = (newItem) => {
dispatch({
type: 'checked todo',
item: newItem,
});
};
return (
<>
<div className={style.header}>
<h2>My To Do List</h2>
<TaskAdd onAdd={handleAdd} />
</div>
<TaskList items={state} onDelete={handleDelete} onChecked={handleChecked} />
</>
);
};
|
現在嘗試操作看看,功能保持不變。設計上提升到一個可集中管理的 reducer。reducer 適合對於同一個 state 有多個資料操作的應用。如果 state 規模小需求低可以只用 useState 就好。
部分設計者,會在一個主元件只使用一個 reducer 來規劃所有資料異動。不管任何資料都來自同一個 store 內的 state 來管理,例如這個範例上,除了 Todo 主元件的 list 資料還有 Add 元件的 text。可能 store 的 initState 會規劃成:
const initState = {
  inputText:'',
  todoList:[
    { id: 1, text: 'Hit the gym', checked: false },
    { id: 2, text: 'Pay bills', checked: true },
    { id: 3, text: 'Meet George', checked: false },
    { id: 4, text: 'Buy eggs', checked: false },
    { id: 5, text: 'Read a book', checked: false },
    { id: 6, text: 'Organize office', checked: false },
  ]
};
|
在 reducerFn 根據哪個 action 來決定對資料物件的 inputText 還是 list 做更新。但事實上, inputText 是否適合放入 reducer 內則因人而異,因為它的使用很單純。但集中管理 state 狀態就是 reducer 的優點。
結合 Reducer 與 Context 獨立為一個自訂的 hook
接著 useReducer 話題,他只是替換 useState 的用法。資料流位置於上層元件往下傳的原理還是一樣的,由父層來規劃資料源頭,透過 props 往下傳遞。目前的做法雖然集中管理,但個人覺得還不夠完美。
- 最上層規劃了 useReducer 而代碼變多。
- action type 被 dispatch 跟 reducer 兩處使用,應規劃可共用的 action 值。
- 仍還是需要透過 props 把資料往下傳,把資料異動事件往上傳。
獨立 action
先試圖把 action 獨立,使得 dispatch 跟 reducer 可以更方便共享 action。
- 共享的 action 命名,設計成靜態變數,方便從別處拿取使用。
- action 可以建議改成拿一個參數,他會返回包含 type 的新物件。
src\pages\lesson02\todoList\store\actions.jsexport const ADD_TODO = 'add todo';
export const DELETE_TODO = 'delete todo';
export const CHECKED_TODO = 'checked todo';
export const addTodo = (item) => ({ type: ADD_TODO, item });
export const deleteTodo = (id) => ({ type: DELETE_TODO, id });
export const checkedTodo = (item) => ({ type: CHECKED_TODO, item });
|
而影響的 dispatch 跟 reducer 改變。
- import 可以用 * 萬用字元接住別名化,使得拿回來的是一個大物件。
- action 參數可以透過 ES6 先解構,拆成 type 跟其他 props,這個 props 再解取成所需的資料
- 注意因為 action 的參數被我們改成只有一個,因此 dispatch 的部分要調整配合。
src\pages\lesson02\todoList\index.jsx
import * as action from './store/actions.js';
const TodoList = () => {
const reducerFn = (state, { type, ...props }) => {
switch (type) {
case action.ADD_TODO: {
return [...state, props.item];
}
case action.DELETE_TODO: {
return state.filter((item) => item.id !== props.id);
}
case action.CHECKED_TODO: {
return state.map((item) => (item.id === props.item.id ? props.item : item));
}
default: {
throw Error('Unknown action: ' + action.type);
}
}
};
const initState = [
{ id: 1, text: 'Hit the gym', checked: false },
{ id: 2, text: 'Pay bills', checked: true },
{ id: 3, text: 'Meet George', checked: false },
{ id: 4, text: 'Buy eggs', checked: false },
{ id: 5, text: 'Read a book', checked: false },
{ id: 6, text: 'Organize office', checked: false },
];
const [state, dispatch] = useReducer(reducerFn, initState);
const handleAdd = (text) =>
dispatch(
action.addTodo({
id: state[state.length - 1].id + 1,
text,
checked: false,
})
);
const handleDelete = (id) => dispatch(action.deleteTodo(id));
const handleChecked = (newItem) => dispatch(action.checkedTodo(newItem));
return (
<>
<div className={style.header}>
<h2>My To Do List</h2>
<TaskAdd onAdd={handleAdd} />
</div>
<TaskList items={state} onDelete={handleDelete} onChecked={handleChecked} />
</>
);
};
|
獨立 reducer
接著搬移 useReducer 所需要的前置準備,注意 useReducer 還是要保留在主元件上無法移動。
src\pages\lesson02\todoList\store\reducer.jsimport * as action from './actions.js';
export const reducerFn = (state, { type, ...props }) => {
switch (type) {
case action.ADD_TODO: {
return [...state, props.item];
}
case action.DELETE_TODO: {
return state.filter((item) => item.id !== props.id);
}
case action.CHECKED_TODO: {
return state.map((item) => (item.id === props.item.id ? props.item : item));
}
default: {
throw Error('Unknown action: ' + action.type);
}
}
};
export const initState = [
{ id: 1, text: 'Hit the gym', checked: false },
{ id: 2, text: 'Pay bills', checked: true },
{ id: 3, text: 'Meet George', checked: false },
{ id: 4, text: 'Buy eggs', checked: false },
{ id: 5, text: 'Read a book', checked: false },
{ id: 6, text: 'Organize office', checked: false },
];
|
src\pages\lesson02\todoList\index.jsximport { useReducer } from 'react';
import style from './todoList.module.css';
import TaskAdd from './component/taskAdd';
import TaskList from './component/taskList';
import * as action from './store/actions.js';
import * as reducer from './store/reducer.js';
const TodoList = () => {
const [state, dispatch] = useReducer(reducer.reducerFn, reducer.initState);
const handleAdd = (text) =>
dispatch(
action.addTodo({
id: state[state.length - 1].id + 1,
text,
checked: false,
})
);
const handleDelete = (id) => dispatch(action.deleteTodo(id));
const handleChecked = (newItem) => dispatch(action.checkedTodo(newItem));
return (
<>
<div className={style.header}>
<h2>My To Do List</h2>
<TaskAdd onAdd={handleAdd} />
</div>
<TaskList items={state} onDelete={handleDelete} onChecked={handleChecked} />
</>
);
};
export default TodoList;
|
獨立 Context
我們會利用 Context 來讓整個上下層元件都能隨時存取。因此原本在主元件的 action, reducer, dispatch, 甚至 事件的函式都全部透過 Context 來管理。任何元件都不再需要去在乎 reducer 相關用途,只需要透過我們新規劃的 Context 來處理就好。
設計 provider
把主元件的 useReducer, handle 事件都規劃到新 Context 指定位置 ,然後透過 provider 來存取。元件跟 provider 有關聯的資料與方法為:
- 建立 provider 設計為 TodoContext 元件,試圖獲取 state,也就是我們的資料列表之讀取。
- TodoContext 元件 也可以試圖對 provider 操作 add, checked, delete 的方法。也就是資料的寫入。
- provider 會返回一個 provider 的 JSX 元件,
- 根據從主元件搬移過來的資料影響,可以 create 兩個 context 做讀取與寫入兩組。
- createContext 需要放在外面,成為模組作用域,而不是放在函式的作用域內。這是因為函式會重新渲染,導致 createContext 的實例被重新創建,從而導致 Context 的值不斷變化,影響應用程序的穩定性。
- 返回上層元件,將剛建立的 TodoContext 元件包覆到 JSX 內,使得整組元件都能利用該 TodoProvider。
src\pages\lesson02\todoList\context\todoContext.jsximport { createContext, useContext, useReducer } from 'react';
import * as action from '../store/actions.js';
import * as reducer from '../store/reducer.js';
const StateContext = createContext([]);
const DispatchContext = createContext(null);
export function TodoContext({ children }) {
const [state, dispatch] = useReducer(reducer.reducerFn, reducer.initState);
function onAdd(text) {
dispatch(
action.addTodo({
id: state[state.length - 1].id + 1,
text,
checked: false,
})
);
}
function onDelete(id) {
dispatch(action.deleteTodo(id));
}
function onChecked(item) {
dispatch(action.checkedTodo(item));
}
return (
<StateContext.Provider value={state}>
<DispatchContext.Provider value={{ onAdd, onDelete, onChecked }}>
{children}
</DispatchContext.Provider>
</StateContext.Provider>
);
}
|
src\pages\lesson02\todoList\index.jsx
import style from './todoList.module.css';
import TaskAdd from './component/taskAdd';
import TaskList from './component/taskList';
import { TodoContext } from './context/todoContext';
const TodoList = () => {
return (
<TodoContext>
<div className={style.header}>
<h2>My To Do List</h2>
<TaskAdd onAdd={handleAdd} />
</div>
<TaskList items={state} onDelete={handleDelete} onChecked={handleChecked} />
</TodoContext>
);
};
export default TodoList;
|
透過自訂 hook 替換 useContext 的方式
要使用 useContext 的元件必需用到 TodoContext 內的 StateContext 跟 DispatchContext,我們也可以換個方式。透過自己設計並匯出的 function 來直接完成在 TodoContext 內的 StateContext 跟 DispatchContext 操作。這就好比自訂一個 hook 使用,故意命名為 use____。說穿了 hook 就是一個好用的 fn 提供使用。
- 讀取資料在一些專案上,習慣命名為 selector,我們可以命名 useSelector 作為取得資料 hook。
- 修改資料在一些專案上,習慣命名為 facade,我們可以命名 useFacade 作為修改資料 hook。
- 如此一來,元件更清爽,不用理會 context 設計,
- 拔除所有元件上原本的 props,在任何元件需要拿就使用 useSelector,需要修改就使用 useFacade。
src\pages\lesson02\todoList\context\todoContext.jsximport { createContext, useContext, useReducer } from 'react';
import * as action from '../store/actions.js';
import * as reducer from '../store/reducer.js';
const StateContext = createContext([]);
const DispatchContext = createContext(null);
export function TodoContext({ children }) {
const [state, dispatch] = useReducer(reducer.reducerFn, reducer.initState);
function onAdd(text) {
dispatch(
action.addTodo({
id: state[state.length - 1].id + 1,
text,
checked: false,
})
);
}
function onDelete(id) {
dispatch(action.deleteTodo(id));
}
function onChecked(item) {
dispatch(action.checkedTodo(item));
}
return (
<StateContext.Provider value={state}>
<DispatchContext.Provider value={{ onAdd, onDelete, onChecked }}>
{children}
</DispatchContext.Provider>
</StateContext.Provider>
);
}
export function useSelector() {
return useContext(StateContext);
}
export function useFacade() {
return useContext(DispatchContext);
}
|
src\pages\lesson02\todoList\index.jsximport style from './todoList.module.css';
import TaskAdd from './component/taskAdd';
import TaskList from './component/taskList';
import { TodoContext } from './context/todoContext';
const TodoList = () => {
return (
<TodoContext>
<div className={style.header}>
<h2>My To Do List</h2>
<TaskAdd />
</div>
<TaskList />
</TodoContext>
);
};
export default TodoList;
|
src\pages\lesson02\todoList\component\taskAdd.jsximport { useState } from 'react';
import style from '../todoList.module.css';
import { useFacade } from '../context/todoContext';
const TaskAdd = () => {
const [text, setText] = useState('');
const { onAdd } = useFacade();
return (
<>
<input
type="text"
id="myInput"
placeholder="Title..."
value={text}
onChange={(e) => setText(e.target.value)}
/>
<span
className={style.addBtn}
onClick={() => {
if (text === '') return;
onAdd(text);
setText('');
}}
>
Add
</span>
</>
);
};
export default TaskAdd;
|
src\pages\lesson02\todoList\component\taskList.jsximport style from '../todoList.module.css';
import { useFacade, useSelector } from '../context/todoContext';
const TaskList = () => {
const state = useSelector();
const { onChecked, onDelete } = useFacade();
return (
<ul className={style.todoList}>
{state.map((item) => (
<li
key={item.id}
className={item.checked ? style.checked : null}
onClick={() =>
onChecked({
...item,
checked: !item.checked,
})
}
>
{item.text}
<span className={style.close} onClick={() => onDelete(item.id)}>
×
</span>
</li>
))}
</ul>
);
};
export default TaskList;
|
參考文獻