深入 JSX 基本上 JSX 單純只是 React.createElement(component, props, …children) 函式 API 的產物語法糖。假設 JSX 程式碼如下則 React 會自動編譯成:
<MyButton color="blue" shadowSize={2 }> Click Me </MyButton > React .createElement ( MyButton , {color : 'blue' , shadowSize : 2 }, 'Click Me' )
如果是沒有 prop.children 的結尾標籤寫法則為:
<div className="sidebar" /> React .createElement ( 'div' , {className : 'sidebar' } )
因此如果環境上無法使用 JSX,可能是缺少宣告import React from 'react',才能讓 React 使用 React.createElement()。
記點法與括弧記法 攤開 JSX 的原理後,你也可以用物件導向的方式去使用記點法 Dot notation 來代表一個元件來源:
import React from 'react' ;const MyComponents = { DatePicker : function DatePicker (props ) { return <div > Imagine a {props.color} datepicker here.</div > } } function BlueDatePicker ( return <MyComponents.DatePicker color ="blue" /> }
但要注意,不能使用括弧記法 Bracket notation 來代表一個元件來源寫在 JSX 內,除非先使用賦值一個大寫變數來做代替。
import React from 'react' ;import { PhotoStory , VideoStory } from './stories' ;const components = { photo : PhotoStory , video : VideoStory }; function Story (props ) { return <components[props.storyType] story={props.story} /> ; } function Story (props ) { const SpecificStory = components[props.storyType ]; return <SpecificStory story ={props.story} /> }
自訂元件為大寫 由於可能會傳遞元件或元素給 createElement API,因此為了區分他元件命名都是強迫大寫開頭為規則:
import React from 'react' ;function Hello (props ) { return <div > Hello {props.toWhat}</div > } function HelloWorld ( return <Hello toWhat ="World" /> }
props 規則 表達式 規劃 props 時,在{}內式可以使用 JavaScript 表達式的:
<MyComponent foo={1 + 2 + 3 + 4 } />
而像 if 或迴圈這類,雖然不是表達式也可以先執行再帶入:
function NumberDescriber (props ) { let description; if (props.number % 2 == 0 ) description = <strong > even</strong > else description = <i > odd</i > return <div > {props.number} is an {description} number</div > }
字串與布林值 字串上在{}可以省略符號,同時也支援正規表達式
<MyComponent message="hello world" /> <MyComponent message ={ 'hello world '} /> <MyComponent message ="< 3" /> <MyComponent message ={ '<3 '} />
布林值的初始狀態,如果你沒給 prop 賦值,那麼它的預設值就是 true。但不建議這樣偷懶,因為這跟 ES6 的物件縮寫 object shorthand 觀念衝突,例如 {foo} 是 {foo: foo} 的簡寫而不是 {foo: true}:
<MyTextBox autocomplete /> <MyTextBox autocomplete ={true} />
展開運算子 Spread syntax 與 解構 destructuring JavaScript 的展開運算子 (…) 應用也能適用在 props 上使用對 JSX 指定多筆屬性:
function App1 ( return <Greeting firstName ="Ben" lastName ="Hector" /> } function App2 ( const props = {firstName : 'Ben' , lastName : 'Hector' }; return <Greeting {...props } /> }
搭配物件解構 Object destructuring ,就能抽取不要的 props 屬性。以下為多層元件 App->Button->button 元素在傳遞 props 值。其中透過解構完成 2 件事:將 props.kind 換成指定的 props.className 值;抽取出 kind 後的 props 換成...other當作 button 的 props 屬性。
const Button = props => { const { kind, ...other } = props; const className = kind === "primary" ? "PrimaryButton" : "SecondaryButton" ; return <button className ={className} {...other } /> }; const App = ( return ( <div > <Button kind ="primary" onClick ={() => console.log("clicked!")}> Hello World! </Button > </div > ); };
props.children 使用 JSX 寫法時,若有開頭與結尾標籤之間則內容會成為特別的 props 屬性為 children 變數。以下為 JSX 對元件時的寫法,你會獲得 props.children 為 Hello world! 的字串值:
<MyComponent >Hello world!</MyComponent> / / props.children ='Hello world!' ;
這跟 html 標籤邏輯相同,如果是對元素也適用,且同時 React 會自動清除空行,以下渲染結果都相同等價:
<div>Hello World </div> <div > Hello World </div > <div > Hello World </div > <div > Hello World </div >
巢狀 也可以讓 chilren 提供更多元件或元素,跟 HTML 標籤觀念相同。以下都是合法 JSX 寫法:
<MyContainer > <MyFirstComponent /> <MySecondComponent /> </MyContainer > <div > Here is a list: <ul > <li > Item 1</li > <li > Item 2</li > </ul > </div >
JSX 也能以陣列方式去渲染內容
render ( return [ <li key ="A" > First item</li > <li key ="B" > Second item</li > <li key ="C" > Third item</li > ]; }
表達式 在 children 內可以直接使用表達式獲得一個處理後的結果。以下兩者等價:
<MyComponent >foo</MyComponent > <MyComponent > {'foo'}</MyComponent >
將一個函式結果直接寫在 children 提供 render。
function Item (props ) { return <li > {props.message}</li > } function TodoList ( const todos = ['finish doc' , 'submit pr' , 'nag dan to review' ]; return ( <ul > {todos.map((message) => <Item key ={message} message ={message} /> )} </ul > ); }
也能直接去引用任何變數當 children 一部分。
function Hello (props ) { return <div > Hello {props.addressee}!</div > }
callback children children 當作一個 function 提供給下層元件使用 props.children,使 JSX 的延展操作更強大。只要 render 之前獲得結果提供 React 執行渲染即可。
import React from 'react' ;import { render } from 'react-dom' ;function Repeat (props ) { let items = []; for (let i = 0 ; i < props.numTimes ; i++) { items.push (props.children (i)); } return <div > {items}</div > } function ListOfTenThings ( return ( <Repeat numTimes ={10} > {(index) => <div key ={index} > This is item {index} in the list</div > } </Repeat > ); } render ( <ListOfTenThings /> , document .getElementById ('root' ));
忽略的 children false, null, undefined, 與 true 都是有效的 children。它們只是單純不會被 render。以下結果相同:
<div /> <div > </div > <div > {false}</div > <div > {null}</div > <div > {undefined}</div > <div > {true}</div >
利用此特性,以下當變數 showHeader 為 true 時,會多渲染一個 Header 元件。
<div> {showHeader && <Header /> <Content /> </div>
如果你想要印出 false、true、null 或者 undefined 時,只能先轉為 string
<div> My JavaScript variable is {String (myVariable)}. </div>
Portal children 傳送 props.children 的使用方式上,能將上層外部元件的子內容獲取至內部使用。舉例以下例子
在 App 元件內規劃一個 on 按鈕並顯示一個 off 按鈕,且可觸發關閉此按鈕。
透過 state 狀態 showModal 來決定 on 按鈕下方是否顯示 off 按鈕。
Modal 元件會根據 props.children 從 App 那裏拿到 off 按鈕。
import React , { useState } from 'react' ;import { render } from 'react-dom' ;const appRoot = document .getElementById ('app-root' );function Modal (props ) { return ( <div > {props.children} </div > ); } function App ( const [showModal, setShowModal] = useState (false ); const doShow = (setShowModal (true ); const doHide = (setShowModal (false ); const modal = showModal ? ( <Modal > <button onClick ={doHide} > Hide modal</button > </Modal > ) : null ; return ( <> <button onClick ={doShow} > Show modal</button > {modal} </> ); } render (<App />
然而,如果這樣的設計場合發生在 Modal 視窗廣告社記,可能這樣般的操作其開啟的元素是相鄰元素而不是上下元素。因此我們可以透過 Portal 將 props.children 傳送到其他指定的非直系關係之 DOM 元素上。也就是 off 按鈕可以放在其他位置而不是只能在自己下層的元件裡面。
使用 Portal 需要透過ReactDOM.createPortal(child, container)來宣告,child 可以是任何要渲染的 React 之 child,實質內容可以 element、string 或 fragment。container 則是你想要放置目標的 DOM 元素。
調整上面範例如下,規劃出現 off 按鈕在<div id="modal-root"></div>位置內,而不是本身<div id="app-root"></div>內:
為了動態生成 DOM,透過 useEffect 來操作生命週期產生 el(div 元素)放置卸除在<div id="app-root"></div>內
在 Modal 元件的渲染動作下,要求獲得的 props.children 內容放到目標 el 內。
import React , { useEffect, useState } from 'react' ;import { createPortal, render } from 'react-dom' ;const appRoot = document .getElementById ('app-root' );const modalRoot = document .getElementById ('modal-root' );function Modal (props ) { const el = document .createElement ('div' ); useEffect (() => { modalRoot.appendChild (el); return () => modalRoot.removeChild (el); }); return createPortal (props.children , el); } function App ( const [showModal, setShowModal] = useState (false ); const doShow = (setShowModal (true ); const doHide = (setShowModal (false ); const modal = showModal ? ( <Modal > <button onClick ={doHide} > Hide modal</button > </Modal > ) : null ; return ( <> <button onClick ={doShow} > Show modal</button > {modal} </> ); } render (<App />
視覺化實例可從 CodePen 參考 。本篇參考來源為官方 CodePen 範例 改編,差別於使用 function hook 完成。
傳送包含 Event Bubbling Portal 特性為根據 React 內部存在 tree 來運作,因此本身不套用原 JavaScript 觀念上 DOM 的位置邏輯。這包含了 context 操作以及 Event Bubbling 事件傳遞冒泡 都能正常傳遞。
舉例 Event Bubbling 的基本觀念,若上層 div 有一個點擊事件,因 DOM 機制而將事件傳遞到其所有下層,因此按鈕 button 也是能觸發事件。
<div id ="app-root" > <div onclick ="doClick()" style ="backgroundColor: pink, padding: 10px" > <p > count:0</p > <div > <button > click</button > </div > </div > </div >
假若下層部分透過 protal 將傳送渲染至另一個 div 內,雖然 JavaScript 的 DOM 邏輯不該發生 button 可觸發事件,事實上因為由 React Tree 來規劃的,傳遞效果仍存在。
<div id ="app-root" > <div onclick ="doClick()" style ="backgroundColor: pink, padding: 10px" > <p > count:0</p > </div > </div > <div id ="modal-root" > <div > <button > click</button > </div > </div >
整體 React 範例如下,視覺化實例可從 CodePen 參考 。
import React , { useEffect, useState } from 'react' ;import { createPortal, render } from 'react-dom' ;import './App.css' ;const appRoot = document .getElementById ('app-root' );const modalRoot = document .getElementById ('modal-root' );function Modal (props ) { const el = document .createElement ('div' ); useEffect (() => { modalRoot.appendChild (el); return () => modalRoot.removeChild (el); }); return createPortal (props.children , el); } function App ( const [count, setCount] = useState (0 ); const doClick = (setCount (count + 1 ); return ( <div onClick ={doClick} style ={{ backgroundColor: 'pink ', padding: '10px ' }}> <p > count:{count}</p > <Modal > <BubbleClick /> </Modal > </div > ); } function BubbleClick ( return <button > Click</button > } render (<App />
代碼分割 React 本身透過 import 來載入必要的模組,而自己設計的元件也能學樣的規劃成外部元件庫透過 import 載入。export 可以將函式、物件甚至是純值匯出。而 import 與 export 本身來自 JavaScript 的模組管理方法。
named export
src/App.js import React from 'react' ;function WelcomeF ( return <h1 > Hello!!</h1 > } class WelcomeC extends React.Component { render ( return <h1 > Hello!!</h1 > } } export { WelcomeF , WelcomeC };
src/index.js import { render } from 'react-dom' ;import { WelcomeC , WelcomeF } from "./App" ;render (<WelcomeF /> document .querySelector ('#demo1' ));render (<WelcomeC /> document .querySelector ('#demo2' ));
default export
src/App.js import React from 'react' ;function WelcomeF ( return <h1 > Hello!!</h1 > } export default WelcomeF ;
src/index.js import { render } from 'react-dom' ;import Demo from "./App" ;render (<Demo /> document .querySelector ('#demo1' ));
或者包裝成物件方式來使用。
src/App.js import React from 'react' ;function WelcomeF ( return <h1 > Hello!!</h1 > } class WelcomeC extends React.Component { render ( return <h1 > Hello!!</h1 > } } export default { WelcomeF , WelcomeC };
src/index.js import { render } from 'react-dom' ;import Demo from "./App" ;render (<Demo.WelcomeC /> document .querySelector ('#demo1' ));render (<Demo.WelcomeF /> document .querySelector ('#demo2' ));
動態 import() 隨代碼的開發量變大,載入等待時間會影響網頁執行效能。可以考慮使用動態載入(非同步作業)透過 import() 函式,使程式碼讀取到此部分會自動額外進行載入。此功能為 Webpack(Create React App) 或其他 Next.js 框架提供之功能函式。
src/App.js import React from 'react' ;function WelcomeF ( return <h1 > Hello!!</h1 > } class WelcomeC extends React.Component { render ( return <h1 > Hello!!</h1 > } } export { WelcomeF , WelcomeC };
src/index.js import { render } from 'react-dom' ;import ("./App" ).then (obj => console .log (obj); render (<obj.WelcomeC /> document .querySelector ('#demo1' )); render (<obj.WelcomeF /> document .querySelector ('#demo2' )); }).catch (err => console .log (err); }); console .log ('first command' );
如果使用 default export 方式,獲得多一層為 default 的 object,使用上就變成為obj.default.WelcomeC。
優化載入 React Suspense & React Lazy 在開發專案的時候透過 webpack 將不同模組的 component 打包成同一支 js,但規模越大載入時間也會拉長影響使用者體驗,而且並非所有的程式碼的功能會在一開始就使用。透過 React lazy 可以將程式碼拆分成不同的區塊延遲進行動態 import ,優先載入比較重要的 js。並搭配 suspense 包覆 component 讓 React 知道這部分內容需要等 Lazy 載入回來才能顯示,suspense 能使用多個 Lazy 元件。
此來自 16.6 才開始有的功能,但無法在 SSR(server-side) 使用 (React 承諾將在未來版本上解決)。如果有 SSR 開發上使用需求則需要透過別人的 Loadable Components 來解決。
React.lazy() 此函式能協助我們從外部元件進行動態匯入,由於只能獲得一個元件結果因此只能對 default export 元件檔案存取。而參數必須是一個非同步連結(具備 Promise 回應)的 import() 函式結果。
const SomeComponent = React .lazy (() => import ('./SomeComponent' ));
接著就是搭配 Suspense 提供做為渲染使用。
React.Suspense 本身是一個預留用的元件標籤,提供屬性 fallback 能在未動態取回時呈現預設等待之內容。而下層內容為可指定 JSX 與 lazy。
import React , { Suspense } from 'react' ;const OtherComponent = React .lazy (() => import ('./OtherComponent' ));function MyComponent ( return ( <div > <Suspense fallback ={ <div > Loading...</div > }> <OtherComponent /> </Suspense > </div > ); }
lazy 可以多個於同一個 Suspense 內。
import React , { Suspense } from 'react' ;const OtherComponent = React .lazy (() => import ('./OtherComponent' ));const AnotherComponent = React .lazy (() => import ('./AnotherComponent' ));function MyComponent ( return ( <div > <Suspense fallback ={ <div > Loading...</div > }> <section > <OtherComponent /> <AnotherComponent /> </section > </Suspense > </div > ); }
抽取來自 named export 由於 lazy() 只能對應一個元件,如果你的元件來自於 named export 其中一項將無法取得。只能透過一個中繼方式從中獲取指定一項輸出成 default export,再由 lazy 取回。
ManyComponents.js export const ComponentA = ;export const ComponentB = ;
MyComponentB.js export { ComponentB as default } from "./ManyComponents.js" ;
MyApp.js import React , { lazy } from 'react' ;const MyComponentB = lazy (() => import ("./MyComponentB.js" ));
Context 用於解決多層元件由上至下傳遞 props 的繁瑣問題。而 Context 可在不使用 props 情況下完成,先創建 Context 全域元件變數後,能在起始點元件上塞入值,並在目的端取出值。適合用在一些下層多數元件都需要的變數。
舉例來說,下列組合元件的結構為 APP(提供參數)>Toolbar>ThemeButton>Button(使用參數),勢必需要透過 prop 來一個個傳遞下去。
import {render} from 'react-dom' ;function App ( return <Toolbar theme ="yellow" /> } function Toolbar (props ) { return ( <div > <ThemedButton theme ={props.theme} /> </div > ); } function ThemedButton (props ) { return <Button theme ={props.theme} /> } function Button (props ) { return ( <button style ={{ backgroundColor: props.theme }}> DEMO</button > ); } render ( <App /> document .getElementById ('demo' ) );
class 的 Context Context 不支援 function 來使用(但可使用 Hook),使用方式如下:
在全域上利用React.createContext()建立 Context 元件變數,參數可提供一開始之初始值。
在需要使用此 Context 變數改寫值的地方,使用 Context.Provider 並指定屬性 value 進行內容值改變。React 自從被 createContext 時會去尋找最近的 Provider 讀取值。
接著在想要傳遞的元件放置在該 Context 標籤內,React 會幫你把此值往指定元件傳送過去。
中途元件不需特別設定。
目標 class 元件要取此 Context 時,需要特別指定此 context 給該元件的 contextType。import { Component , createContext } from 'react' ;import { render } from 'react-dom' ;const MyContext = createContext ('red' ); function App ( return ( <MyContext.Provider value ='yellow' > //要將新值提供給 context 時,需要用標籤包覆起來。 <Toolbar /> </MyContext.Provider > ); } function Toolbar ( return ( <div > <ThemedButton /> </div > ); } class ThemedButton extends Component { render ( return <Button theme ={this.context} /> } } ThemedButton .contextType = MyContext ; function Button (props ) { return ( <button style ={{ backgroundColor: props.theme }}> DEMO</button > ); } render ( <App /> document .getElementById ('demo' ) );
或者專案環境支援 public class fields syntax 語法,與前步驟效果相同,可以改用 class 的 static 方式來設定 contextType。class ThemedButton extends Component { static contextType = MyContext ; render ( console .log (this .context ); return <Button theme ={this.context} /> } }
API 相關說明 React.createContext 建立一個 Context 物件,當 React 進行渲染到此指令,會從這個元件關聯樹狀尋找與他對應的 Provider 之內容值。如果找不到 Provider 則會以原本的初始參數來生效。
const MyContext = React .createContext (defaultValue);
Context.Provider Context 物件會有一個 Provider 用的组件形式。Context 能被其他元件連接並修改 Context 的值,透過 Provider 元件屬性 value 來修改,並根據包覆的元件進行關聯樹狀傳遞此 Context。Provider 可以在不同的其他元件建立關聯樹狀。而一旦 value 產生變化 React 會去對關聯樹狀上的目標元件上重新渲染翻新此值。
<MyContext .Provider value={}>
Class.contextType 目標 Class 元件想從 Context 上獲得值,則必須要指定 Class 的 contextType 指定為哪個 Context 物件。接著能在任何生命週期或 render 上使用 this.context 取得內容值。
class MyClass extends React.Component { render ( let value = this .context ; } } MyClass .contextType = MyContext ;
或者在支援 public class fields 環境,使用 static 類屬性來初始化這個 class 的 contextType。
class MyClass extends React.Component { static contextType = MyContext ; render ( let value = this .context ; } }
Context.Consumer 與 Context.Provider 雷同都是修改 context 值,但屬於適用在 render props 的方式下(之後介紹),依賴。
<MyContext .Consumer > {value => </MyContext .Consumer >
Context.displayName 對 Context 提供一個名稱使用文字串,在開發工具上可以看見此 Context 名字。
const MyContext = React .createContext ();MyContext .displayName = 'LokiName' ;<MyContext .Provider > <MyContext .Consumer >
範例:可變的 Context 首先我們產生一個靜態且尋源頭失敗的 Context 值。
規劃 App 為主要元件,引用 ThemedButton 元件,ThemedButton 元件位於外部檔案 themed-button.js
ThemedButton 使用ThemedButton.contextType = ThemeContext;來獲得 theme 值。而 ThemeContext 元件位於外部檔案 theme-context.js
React 會去尋找上源的 Provider,因為找不到而使得 Context 的值為預設 theme.dark(資料來自同檔案)。
ThemedButton 元件因為會用到 props.children 來提供內容,渲染的 button 可透過{…props}當作屬性,一次灌入來自 ThemedButton 的 props 獲得內容。
index.js import React from 'react' ;import ReactDOM from 'react-dom' ;import ThemedButton from './themed-button' ;class App extends React.Component { render ( return ( <ThemedButton > Normal Button</ThemedButton > ); } } ReactDOM .render (<App /> document .getElementById ('root' ));
themed-button.js import React from 'react' ;import { ThemeContext } from './theme-context' ;class ThemedButton extends React.Component { render ( let props = this .props ; let theme = this .context ; console .log ({...props}); return ( <button {...props } style ={{ backgroundColor: theme.background , color: theme.color }} /> ); } } ThemedButton .contextType = ThemeContext ;export default ThemedButton ;
theme-context.js import React from 'react' ;const themes = { light : { color : '#000000' , background : '#eeeeee' , }, dark : { color : '#ffffff' , background : '#222222' , }, }; export const ThemeContext = React .createContext ( themes.dark );
接著當作對造組,我們產生另一個透過 state 對應使得產生可變的 Context。
App 建立 state 為 light 並規劃 event 事件來切換 dark,state 從 theme-context.js 的 theme 取得。
因此 theme-context.js 內的 theme 變數要 export 出來,提供 index.js 做 import。
APP 會引用 ThemeContext.Provider 這個 Context 並賦予他初始值,初始值來自 state 值。
ThemeContext 元件位於外部檔案 themed-context.js 記得 import
為了區別出不同 ThemedButton 元件,多一個仲介 Toolbar 元件,提供 onclick 給 ThemedButtonindex.js import React from 'react' ;import ReactDOM from 'react-dom' ;import ThemedButton from './themed-button' ;import { ThemeContext , themes } from './theme-context' ;function Toolbar (props ) { return ( <ThemedButton onClick ={props.changeTheme} > Change Theme</ThemedButton > ); } class App extends React.Component { state = { theme : themes.light , }; toggleTheme = () => { this .setState (state => theme : state.theme === themes.dark ? themes.light : themes.dark , })); }; render ( return ( <> <ThemedButton > Normal Button</ThemedButton > <ThemeContext.Provider value ={this.state.theme} > <Toolbar changeTheme ={this.toggleTheme} /> </ThemeContext.Provider > </> ); } } ReactDOM .render (<App /> document .getElementById ('root' ));
theme-context.js import React from 'react' ;export const themes = { light : { color : '#000000' , background : '#eeeeee' , }, dark : { color : '#ffffff' , background : '#222222' , }, }; export const ThemeContext = React .createContext ( themes.dark );
CodePen 預覽 ),能發現已產生可變化的 context,原因在於 Context 幫助我們把 App 的 state 值與修改權限透過 Context 傳遞給 Button 當參數使用。而 Context 也能反向找到上源頭的 Provider 獲得初始值 light。
不使用 Context 的替代方案 Context 主要是讓在不同層級下的多數元件能訪問相同的數據使用。但如果只是只針對一組使用來說整體的規畫準備就不太適合。假設與前面例子類似有以下元件需要傳遞。如果都使用 props 來接力傳遞就太笨拙,下例當中 Context 只有 Link 這個元件標籤使用存取,整體來說就不划算。
<Page user={user} avatarSize={avatarSize} /> <PageLayout user ={user} avatarSize ={avatarSize} /> <NavigationBar user ={user} avatarSize ={avatarSize} /> <Link href ={user.permalink} > <Avatar user ={user} size ={avatarSize} /> </Link >
我們可改用 Component 組合模型來規畫此功能。先將範例設計出來逐步修改,首先用到 props.childen 來解決 Link>Avatar 的組合模型。
import { render } from 'react-dom' ;function App ( const user = { permalink : "http://www.loki.com" , img : "./loki.jpg" }, avatarSize = 100 ; return ( <Page user ={user} avatarSize ={avatarSize} /> ); } function Page (props ) { return ( <PageLayout user ={props.user} avatarSize ={props.avatarSize} /> ); } function PageLayout (props ) { return ( <NavigationBar user ={props.user} avatarSize ={props.avatarSize} /> ); } function NavigationBar (props ) { return ( <Link href ={props.user.permalink} > <Avatar user ={props.user} size ={props.avatarSize} /> </Link > ); } function Link (props ) { return ( <a href ={props.href} > {props.children}</a > ); } function Avatar (props ) { return <img src ={props.user.img} width ={props.size} alt ="description" /> } render ( <App /> document .getElementById ('demo' ) );
接著將會用到這些資料的元件標籤提升到與資料來源相同的同層元件,將直接獲得這些數據的元件標籤當作內容傳遞下去。這樣的設計只有 App 元件是知道 Link 與 Avatar 是如何去使用 user 與 size 資料的,其他下層元件不用去幫忙傳遞這兩筆,但會幫忙傳遞整個元件下去。
import { render } from 'react-dom' ;function App ( const user = { permalink : "http://www.loki.com" , img : "./loki.jpg" }, avatarSize = 100 ; const userLink = ( <Link href ={user.permalink} > <Avatar user ={user} size ={avatarSize} /> </Link > ); return ( <Page userLink ={userLink} /> ); } function Page (props ) { return ( <PageLayout userLink ={props.userLink} /> ); } function PageLayout (props ) { return ( <NavigationBar userLink ={props.userLink} /> ); } function NavigationBar (props ) { return props.userLink ; } function Link (props ) { return ( <a href ={props.href} > {props.children}</a > ); } function Avatar (props ) { return <img src ={props.user.img} width ={props.size} alt ="description" /> } render ( <App /> document .getElementById ('demo' ) );
這樣的反轉寫法雖然還是 props 大隊接力,但能減少 props 的使用量並減少代碼。如果你想傳遞的不只一個元件,可以再多一元件變數做兩筆大隊接力傳遞。
function Page (props ) { const user = props.user ; const content = <Feed user ={user} /> const topBar = ( <NavigationBar > <Link href ={user.permalink} > <Avatar user ={user} size ={props.avatarSize} /> </Link > </NavigationBar > ); return ( <PageLayout topBar ={topBar} content ={content} /> ); }
hook 的 Context 如果是採用 function 元件並搭配 hook 方式設計,hook 提供 context 函式供給使用。整題流程大同小異
透過 React.createContext(default value) 取得 Context 變數並賦予預設值。
透過 Context 元件的 Provider 來設定源頭包覆位置,並可透過 value 提供初始值。
終端元件透過 useContext(Context 名稱)來指定該元件接收來自哪個 Context。
最後,該終端元件可獲取來自 Context 值與變化。
const themes = { light : { foreground : "#000000" , background : "#eeeeee" }, dark : { foreground : "#ffffff" , background : "#222222" } }; const ThemeContext = React .createContext (themes.light );function App ( return ( <ThemeContext.Provider value ={themes.dark} > <Toolbar /> </ThemeContext.Provider > ); } function Toolbar (props ) { return ( <div > <ThemedButton /> </div > ); } function ThemedButton ( const theme = useContext (ThemeContext ); return ( <button style ={{ background: theme.background , color: theme.foreground }}> I am styled by theme context! </button > ); }
ref 典型的 React 操作設計,會利用 props 與 state 來規劃上下層級元件,並透過更改 props 值存取調整影響渲染 render 畫面更新。這裡介紹的 ref 則是不同的資料觀念。ref 可以是一個 JSX 元素或是一個下層元件代表。透過 ref 標記,就能以 current 方式找到這個對象做影響操作,而不是透過 props 完成資料操作。
ref 的生命週期有以下特性:
ref 在生命週期的 mount 當下產生 current 結果,而 unmount 時則清空 current 為 null。
ref 的更新時機在生命週期的 componentDidMount 或 componentDidUpdate 之前。
ref 可以有兩種用途,一種是讀取 JSX 元素做事件反應,另一種是讀取 Class 元件的物件實例 instance 進行操作。
向 DOM 元素添加 Ref ref 可對本體元件內的 render 內的 JSX 元素打上 ref 屬性標記,透過 current 來採用 JavaScript 原生 DOM 節點進行改變操作。React 會自動偵測該 DOM 節點的變化產生渲染而不是透過 props 來偵測。以下為步驟操作:
建立一個 ref 物件。class 元件與 function 元件(使用 Hook) 寫法有所差異。
在 render() 內的 JSX 語法上,對指定的元素設定屬性ref={REF_NAME}。
可在其他地方透過this.REF_NAME.current來獲得該 DOM 節點,例如可規劃一個 event 事件去做一些反應或操作此 Node。
Class 元件 的 ref 建立 ref 方式為透過React.createRef()並另名:以下範例為一個 input:text 為我們的 ref 元素,另外兩個按鈕透過 event 事件來對 current(等價該 DOM 節點)操作 DOM。
import React from 'react' ;import { render } from 'react-dom' ;class CustomTextInput extends React.Component { textInput = React .createRef (); onFocus = () => { console .log (this .textInput .current ); this .textInput .current .focus (); } onVal = () => { this .textInput .current .value = this .textInput .current .value .concat ("A" ); } render ( return ( <div > <input type ="text" ref ={this.textInput} > </input > <button type ="button" onClick ={this.onFocus} > focus input</button > <button type ="button" onClick ={this.onVal} > push value A</button > </div > ); } } render (<CustomTextInput /> document .getElementById ('root' ));
function 元件 的 ref 建立 ref 物件會透過 useRef() 來達到,同上範例改成 function 元件之寫法。
import React , { useRef } from 'react' ;import { render } from 'react-dom' ;function CustomTextInput (props ) { const textInput = useRef (); const onFocus = ( textInput.current .focus (); console .log (textInput.current ); } const onVal = ( textInput.current .value = textInput.current .value .concat ("A" ); } return ( <div > <input type ="text" ref ={textInput} > </input > <button type ="button" onClick ={onFocus} > focus input</button > <button type ="button" onClick ={onVal} > push value A</button > </div > ); } render (<CustomTextInput /> document .getElementById ('root' ));
向下層 Class Component 添加 Ref 與前者步驟相同但差別用途於在 class component 上時,則是獲得這個下層 class 元件的物件實例 instance。
注意你只能對下層為 Class 之類型元件使用標記 ref,無法對 function 元件做標 ref 記(因為沒有 instance 可做為 current 目標)。
舉例,規劃一個 class 上層元件,在 render 時對下層 class 元件註記 ref。我們就能對該 class 的 instance 進行動作,例如透過上層的生命週期來執行下層元件的函式方法觸發。
import React from 'react' ;import { render } from 'react-dom' ;class CustomTextInput extends React.Component { textInput = React .createRef (); onFocus = () => { this .textInput .current .focus (); console .log (this .textInput .current ); } onVal = () => { this .textInput .current .value = this .textInput .current .value .concat ("A" ); } render ( return ( <div > <input type ="text" ref ={this.textInput} > </input > <button type ="button" onClick ={this.onFocus} > focus input</button > <button type ="button" onClick ={this.onVal} > push value A</button > </div > ); } } class AutoFocus extends React.Component { childClass = React .createRef (); componentDidMount ( console .log (this .childClass .current ); this .childClass .current .onFocus (); } render ( return ( <CustomTextInput ref ={this.childClass} /> ); } } render (<AutoFocus /> document .getElementById ('root' ));
Callback Refs 整體應用方式與前面一樣,唯獨設定 Ref 的方式上有所不同。不是產生 React.createRef() 的 ref 物件而是透過自訂 function 來獲得 instance 內的變數並 callback 給目標 ref 屬性。且不用 current 來找到該資料直接就能使用。
建立一個 instance 變數作為 Ref,初始為 null
自訂一個箭頭 function,透過獲得來源的參數來複寫該變數
在目標 JSX 元素或下層元件,屬性 ref 則對應該自訂 function,React 會將此對象當作參數引入該 function,使得完成 callback ref 動作
讀取該目標方式不再需要使用 current,整體動作與 React.createRef() 作法一致
import React from 'react' ;import { render } from 'react-dom' ;class CustomTextInput extends React.Component { textInput = null ; settextInputRef = val => this .textInput = val; } onFocus = () => { this .textInput .focus (); console .log (this .textInput ); } onVal = () => { this .textInput .value = this .textInput .value .concat ("A" ); } render ( return ( <div > <input type ="text" ref ={this.settextInputRef} > </input > <button type ="button" onClick ={this.onFocus} > focus input</button > <button type ="button" onClick ={this.onVal} > push value A</button > </div > ); } } class AutoFocus extends React.Component { childClass = null ; setchildClassRef = cpm => this .childClass = cpm; } componentDidMount ( this .childClass .onFocus (); } render ( return ( <CustomTextInput ref ={this.setchildClassRef} /> ); } } render (<AutoFocus /> document .getElementById ('root' ));
而這個方式就能適用在下層為 function 元件的環境上。
傳送 Ref 目前學會的 ref 都是在同層元件內去取得 DOM,但在很少的情況下可能會想要從上層元件獲取下層元件的 DOM 節點。這就需要透過傳送 React.forwardRef() 來幫助我們將下層元件的 DOM 暴露出來提供上層元件獲取。傳送 ref 能把 ref 從上層元件傳遞到它下層元件的技巧。但一般情況不建議這麼做,因為這會破壞元件封裝,但有時候這麼做對於觸發 focus 或測量下層元件的 DOM 節點的大小、位置是很有用的。
一些情況下,有些最底層的元件只是普通的 DOM 像是按鈕或表單欄位被多個上層元件通用,此時這些上層元件就希望能去控制這些底層元件 DOM 進行像是 focus、click、甚至特效,上一層元件想獲取該底層元件的 DOM 是可能發生的。
舉例有一個底層元件被兩個上層元件所使用,如下:
import { render } from 'react-dom' ;function FancyButton (props ) { return ( <button className ="FancyButton" > {props.children} </button > ); } function App1 ( return ( <FancyButton > Click 1!</FancyButton > ); } class App2 extends React.Component { render ( return ( <FancyButton > Click 2!</FancyButton > ); } } render ( <> <App1 /> <App2 /> </> , document .getElementById ('root' ));
為了讓兩個上層元件根據各自需求去獲得底層元件按鈕的 DOM,是必要透過傳送 ref 將原本只能控制自己 ref 跨到底層元件去。將底層元件進行改寫,使用 React.forwardRef() 函式讓這個底層元件除了 props 也可接受來自上層的 ref 物件,暴露自己的 DOM 給上層。該傳送 ref 函式需放入一匿名箭頭函式。
最後,是時尚這個底層元件已經不算是原本的元件設計,而是一個 forwardRef 提供給你的 JSX 元件。
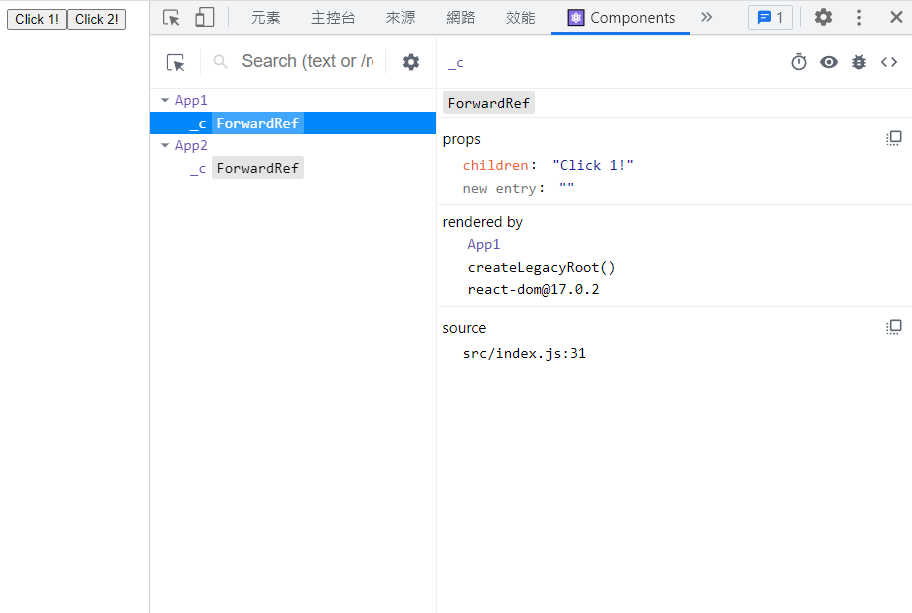
import React , { useEffect, useRef } from 'react' ;import { render } from 'react-dom' ;const FancyButton = React .forwardRef ( (props, ref ) => { return ( <button className ="FancyButton" ref ={ref} > {props.children} </button > ); } ) function App1 ( const refApp1 = useRef (); useEffect (() => { console .log ('refApp1' , refApp1.current ); }); return ( <FancyButton ref ={refApp1} > Click 1!</FancyButton > ); } class App2 extends React.Component { refApp2 = React .createRef (); componentDidMount ( console .log ('refApp2' , this .refApp2 .current ); } render ( return ( <FancyButton ref ={this.refApp2} > Click 2!</FancyButton > ) }; } render ( <> <App1 /> <App2 /> </> , document .getElementById ('root' ));
傳送 ref 的用途除了對外部底層 DOM 操作,也能對外部元件操作獲得物件實例,此不再示範。
開發工具上的客製化名稱 如果使用開發工具觀察元件關係,可發現原本底層元件的名稱已變成 ForwardRef。這是因為已經不是原先一個元件按鈕結構而是由 ForwardRef 所提供的下層元件。如果有需要是可以修改此預設名稱。
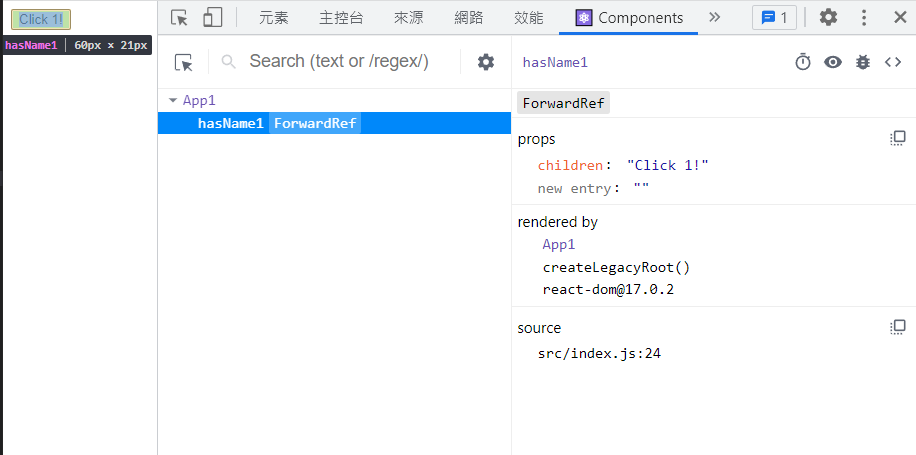
方法 1:提供具名函式 原本是底層元件設計時提供匿名箭頭函式,改為具名的函式做為 ForwardRef 之參數。
import React , { useEffect, useRef } from 'react' ;import { render } from 'react-dom' ;const FancyButton = React .forwardRef ( function hasName1 (props, ref ) { return ( <button className ="FancyButton" ref ={ref} > {props.children} </button > ); } ) function App1 ( const refApp1 = useRef (); useEffect (() => { console .log ('refApp1' , refApp1.current ); }); return ( <FancyButton ref ={refApp1} > Click 1!</FancyButton > ); } render ( <App1 /> , document .getElementById ('root' ));
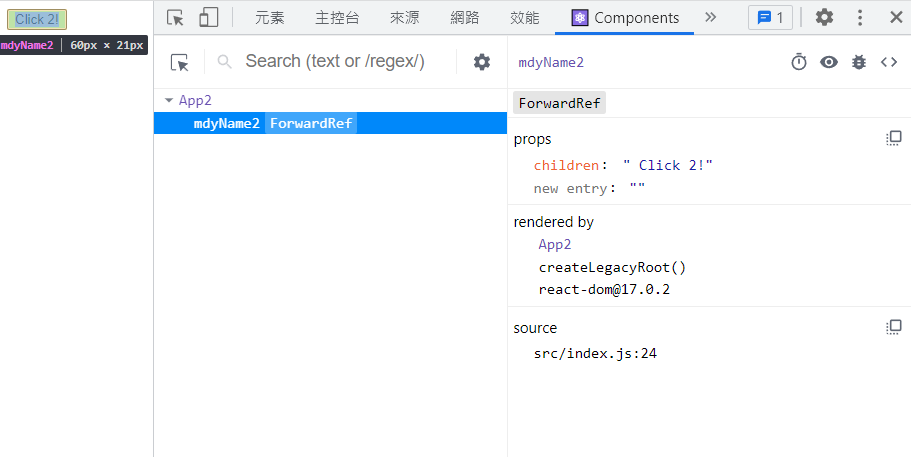
方法 2:透過具名函式增加 displayName 物件屬性 同樣是提供具名函式,React 會先判別這個函式物件屬性 displayName 作為名稱,找不到則以該函式名為稱呼。
import React from 'react' ;import { render } from 'react-dom' ;function hasName2 (props, ref ) { return ( <button className ="FancyButton" ref ={ref} > {props.children} </button > ); } hasName2.displayName = 'mdyName2' ; const FancyButton = React .forwardRef (hasName2);class App2 extends React.Component { refApp2 = React .createRef (); componentDidMount ( console .log ('refApp2' , this .refApp2 .current ); } render ( return ( <FancyButton ref ={this.refApp2} > Click 2!</FancyButton > ) }; } render ( <App2 /> , document .getElementById ('root' ));